Email marketing remains one of the most effective communication channels but when combined with automation, it becomes a powerful tool that can redefine how you engage with customers. Gone are the days of manually sending generic emails to your entire list. With email marketing automation, you can deliver the right message to the right person at the right time, without lifting a finger. This strategic approach not only saves time and resources but also boosts customer satisfaction, engagement, and conversions. In this blog, we’ll explore how email marketing automations can streamline your communication, build stronger relationships, and ultimately transform the way your business connects with its audience.
Email marketing automations allow businesses to engage their audience with tailored content based on behavior, preferences, and interactions. Whether it’s welcoming a new subscriber, reminding a customer of an abandoned cart, or re-engaging inactive users, automation ensures that the right message is sent at exactly the right time without manual effort. This level of personalization not only boosts open and click-through rates but also fosters trust and loyalty over time. In this blog, we’ll dive deep into how email marketing automations can revolutionize your business communication, improve operational efficiency, and deliver measurable results that contribute directly to your bottom line.
What Is Email Marketing Automation How Does It Work?

Email marketing automation is the process of using software tools to automatically send targeted emails to subscribers based on specific triggers, behaviors, or timelines. Rather than sending individual emails manually, businesses can create predefined workflows that respond to user actions such as signing up for a newsletter, making a purchase, abandoning a cart, or clicking on a link. This makes communication timely, relevant, and consistent without requiring constant oversight.
At its core, email marketing automation relies on customer data and behavior tracking. When a user interacts with your website, signs up for your email list, or takes any notable action, that behavior is logged. The automation tool then uses these actions as “triggers” to launch a specific email or a sequence of emails. For instance, a new subscriber might automatically receive a welcome email series, while a returning customer might get product recommendations based on their past purchases.
Automation tools often include visual workflow builders where marketers can set up if/then logic if a user opens an email but doesn't click, send a follow-up; if they click, move them to a different segment. These workflows help tailor content to each recipient, improving engagement and conversion rates. In short, email marketing automation transforms traditional email campaigns into intelligent, efficient systems that nurture leads, engage customers, and drive results with minimal manual intervention. It’s a critical tool for businesses looking to scale their communication and maximize ROI.
Benefits Of Adding Email Marketing Automations on Your Website?
- Personalized Customer Journeys: Automations allow you to send targeted messages based on customer behavior and lifecycle stage. This creates a personalized experience, such as welcome emails for new subscribers or tailored product recommendations for existing customers.
- Improved Customer Retention: Set up automated re-engagement and renewal reminders to keep your audience engaged over time. These timely messages help reduce churn, maintain brand visibility, and strengthen long-term customer relationships management with best WordPress CRM Plugins.
- Efficient Lead Nurturing: Automated drip campaigns guide leads through the sales funnel without manual follow-ups. This ensures consistent communication, educates prospects, and frees up your sales team for higher-priority tasks.
- Streamlined Internal Workflows: Email triggers can notify your team when users take specific actions, like downloading a guide or booking a demo. This keeps your team informed and enables faster, more relevant follow-up actions.
- Advanced Segmentation: Automations help divide your audience based on demographics, behavior, or purchase history. Segmented campaigns deliver more relevant content, leading to better engagement and increased conversion rates.
- Consistent Brand Messaging: Automated emails maintain a uniform tone, format, and design across all campaigns. This builds trust with your audience and strengthens your brand identity over time.
- Enhanced Performance Tracking: Email automation platforms offer analytics and A/B testing options. You can track open rates, CTRs, and conversions to continuously optimize your messaging strategy for better results.
- Higher Engagement & Conversions: With timely and targeted messages, automations boost user engagement and encourage more purchases. This ultimately increases your revenue while reducing manual marketing efforts.
- Better Customer Experience: Automations ensure customers receive the right content at the right time. Timely, useful messages improve satisfaction and encourage loyalty by meeting user expectations seamlessly.
- Resource and Time Efficiency: Automating email tasks saves your team countless hours. Instead of sending emails manually, your campaigns run in the background, allowing you to scale communication effortlessly.
Step-by-step Guide To Add Email Marketing Automations To Your Website?
Adding email marketing automations to your website may seem complex at first glance, especially if you're new to digital marketing. However, with a structured approach and the right tools, the process becomes not only manageable but incredibly rewarding. Email automation can streamline your marketing efforts, improve user engagement, and convert more visitors into loyal customers all without constant manual intervention. Below is a step-by-step guide to help you get started with implementing email marketing automations on your website.
Step 1: Choose An Email Marketing Platform

Your journey begins with selecting the right email marketing automation platform. Look for one that offers robust automation features, a user-friendly interface, and seamless integration with your existing tools. Popular platforms include Mailchimp, ActiveCampaign, ConvertKit, Sendinblue, Klaviyo, and HubSpot. If you’re running an eCommerce store, platforms like Omnisend or Klaviyo offer automation features specifically tailored for online businesses. Be sure the platform supports automated workflows, tagging, segmentation, and analytics. It should also integrate easily with your website’s CMS (like WordPress, Shopify, or Wix) or CRM. We have handpicked some of the top email marketing platforms from which you can automate your email campaigns.
For this tutorial we will be using Klaviyo in order to explain you through the this guide:
Step 2: Log In and Navigate to Flows

To begin setting up an automation in Klaviyo, the first thing you need to do is log into your account at "klaviyo.com". Once logged in, you will be directed to the Klaviyo dashboard, which serves as the central hub for managing your email marketing, campaigns, flows, lists, segments, and analytics. The user interface is clean and intuitive, and the navigation panel is located on the left side of the screen. From this menu, locate and click on the “Flows” tab. This section is specifically designed for automating communication sequences based on customer behavior or interactions. Flows in Klaviyo are highly customizable and allow you to build powerful automations like welcome series, abandoned cart reminders, post-purchase follow-ups, and more.
Navigating to Flows brings you to the flows management screen, where you can see a list of any existing flows you’ve created. Here, you’ll also find the option to create a new flow. If this is your first time creating a flow, the interface may prompt you with tooltips or a getting started guide to help walk you through the basics. The flows dashboard is also where you’ll manage active automations, pause or edit flows, view analytics for each, and duplicate existing flows for easier setup. Klaviyo structures its flows visually, which means you’ll be able to drag, drop, and rearrange elements for a seamless user journey. This interface is one of Klaviyo’s strengths, especially if you prefer building logic visually rather than through text-heavy setup pages. At this point, you’re ready to begin creating your own automated flow tailored to your specific goals.
- Log into your Klaviyo account.
- From the dashboard, click the “Flows” option in the left sidebar.
- This takes you to the automation builder interface.
Before proceeding any further If you Still think that any different platform would be better in order to Setup your email marketing automations then you can visit our Blog How To Integrate SendinBlue (Now Brevo) With WordPress. With this tutorial you will be able to setup your automation with SendinBlue (Now Brevo) in no time.
Step 3: Click “Create Flow”

After accessing the Flows dashboard, the next step is to begin the process of building your automation. On the top-right corner of the screen, you’ll find a button labeled “Create Flow.” Clicking this opens a new window where Klaviyo presents you with two options: to start from scratch or to select a pre-built template. Starting from scratch is ideal if you have a unique automation strategy or advanced experience with building flows. However, Klaviyo also offers a wide variety of templates for common use cases, such as Welcome Series, Cart Abandonment, Post-Purchase Flows, and Birthday Offers. These templates come preloaded with essential trigger events, delays, and recommended messaging which can significantly speed up your workflow and ensure you don’t miss key elements.
If you’re new to automation or just want to save time, using a template is a highly effective option. You can still modify everything later from the trigger type to the email content, delays, and conditions so you maintain full control. On this screen, you’ll also name your flow. It’s good practice to use a clear, descriptive name, especially if you’ll be managing multiple flows. For example, “Welcome Series – New Subscribers” or “Abandoned Cart Reminder – 2 Step Flow” helps you quickly identify the purpose of each automation.
- Click “Create Flow” in the top-right corner.
- Choose to start from scratch or use a template.
- Give your flow a descriptive name for easy identification.
Step 4: Name Your Flow and Choose a Trigger

Once you enter the flow creation interface, Klaviyo prompts you to give your flow a name and choose a trigger the condition that causes a contact to enter the automation. Naming your flow is more important than it seems. A clear and descriptive name not only helps you organize your flows but also makes collaboration easier if you work with a team. It’s a good idea to include the flow’s purpose and any key identifiers, such as the target list or sequence type. For example, a name like “New Subscriber Welcome Series – Main List” is much more helpful than something generic like “Automation 1.”

After naming the flow, the next step is choosing the trigger. This is the foundation of your automation, determining when it starts. Klaviyo offers several types of triggers:
- List Triggered: This starts the flow when someone is added to a specific list (e.g., Newsletter Subscribers).
- Segment Triggered: Starts the flow when someone joins a dynamic segment that meets certain criteria (like High-Value Customers).
- Metric Triggered: Launches the flow when someone performs a specific action (e.g., placed an order, started checkout, viewed a product).
Each trigger serves a specific purpose. For welcome series, a list trigger is ideal. For abandoned carts or post-purchase flows, you’ll often use metric triggers. And for more advanced flows based on customer behavior or attributes, segment triggers offer the most flexibility. Klaviyo also allows adding filters to fine-tune who enters the flow. For example, you might trigger a flow for people who started checkout but only if they haven’t purchased in the last 7 days.
Once your trigger is defined, click “Done” or “Confirm” to lock it in. This sets the base condition upon which you’ll build the rest of your automation.
- Name your flow clearly (e.g., “Post-Purchase Survey – Shopify”).
- Choose a trigger: List, Segment, or Metric based.
- Configure filters to narrow who enters the flow.
Step 5: Configure Trigger Settings

Now that your flow has a name and a trigger, you can fine-tune the trigger’s settings. This step ensures that only the right users enter the flow at the right time. For example, if you chose a list-triggered flow, you’ll be asked to select the specific list. You can connect it to “Newsletter Subscribers” or a list synced from an integration like Shopify or WooCommerce. Once selected, anyone who joins that list will automatically be enrolled in the flow.
If you chose a metric-triggered flow, you need to specify the metric or behavior that starts the flow. For example, the metric “Started Checkout” can trigger an abandoned cart reminder. You can also set filters on this metric like triggering only if the user hasn’t completed a purchase in the past 3 days or only if the cart total exceeds $50. This helps you avoid redundant or irrelevant emails, especially when someone completes the action shortly after triggering it.
- Select the list, metric, or segment for your trigger.
- Add trigger filters to refine entry conditions.
- Use flow filters to prevent oversending or overlap with other emails.
Step 6: Add Actions to the Flow

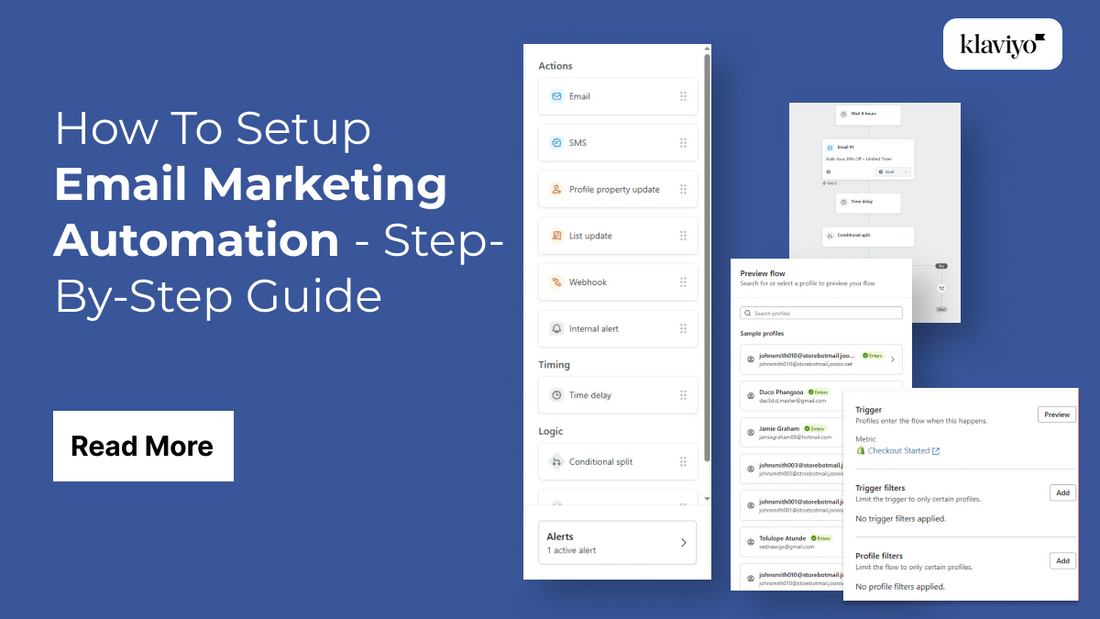
With your trigger configured, you’ll now build out the actual structure of your automation using action blocks. Klaviyo’s flow builder is entirely drag-and-drop, allowing you to visually design the customer journey. Start by clicking the plus (+) icon under the trigger block. This opens a panel of options, including actions like Send Email, Time Delay, Conditional Split, SMS, and more.
Start with the most common action Send Email. Drag this block into the flow. Once placed, you’ll be able to configure the email’s subject line, sender name, and email content. Klaviyo lets you either use its drag-and-drop email builder or build with custom HTML. You can also clone email templates if you’ve previously designed them. Personalization is supported via dynamic fields (e.g., {{ first_name }}) and product recommendations if you're using an eCommerce platform.
- Use the + icon to add actions like Email, SMS, Delay, or Conditional Split.
- Drag and configure each block visually.
- Build a customer journey with relevant timing and personalized content.
Step 7: Design Your Email

Designing the actual email is where you translate your marketing strategy into a visual and written format that users will engage with. Once you’ve added a “Send Email” block in your flow, click on it to open the configuration panel. Klaviyo will prompt you to name the email (for internal use) and set the subject line and sender details. It’s important to maintain consistent branding here use a recognizable sender name and a subject line that aligns with your tone and offer.
Clicking “Edit Content” opens the email builder. Klaviyo provides two main options: Drag & Drop Builder and HTML Editor. For most users, the drag & drop interface is ideal. It allows you to easily insert text, images, buttons, product blocks, and dynamic content without coding. You can customize colors, fonts, and layout to match your brand’s style. Make sure to include a compelling header, concise body copy, and a clear call-to-action (CTA). Keep text blocks short and scannable, use visuals to support the message, and test the layout on both desktop and mobile preview modes. If you want to know more about HTML templates in detail you can also view our Blog on How to make HTML email Templates
- Configure subject line, sender name, and email name.
- Use the drag & drop builder or HTML editor.
- Add dynamic product blocks and personalize using merge tags.
- Test email on different devices before saving.
Step 8: Set Time Delays and Sequence Logic

Once your first email is designed and placed in the flow, it’s time to set the pace of communication by inserting Time Delays. Time delays help space out your messages to avoid overwhelming the user and maintain optimal engagement. In Klaviyo, delays can be set in minutes, hours, days, or even weeks depending on your campaign strategy. For example, in a welcome series, you might send the first email immediately, wait two days, and then send a follow-up.
To add a time delay, drag the “Time Delay” block into the flow and position it between two action steps (like between two emails). Click on it to configure the delay duration. Klaviyo also gives you the option to send emails at specific times of day and days of the week, which is useful for optimizing engagement based on user behavior or time zones. For instance, you may want to avoid weekends for B2B emails or target evenings for lifestyle or entertainment brands.
- Use “Time Delay” to space out emails (e.g., wait 2 days).
- Configure delays by minute, hour, day, or custom schedule.
- Combine with logic blocks like Conditional or Trigger Splits for dynamic flows.
Step 9: Test the Flow Before Going Live

Before activating your automation, it's crucial to test your entire flow to ensure everything works exactly as planned. Testing helps verify not only that your emails are delivering but also that the trigger conditions, time delays, and any conditional logic are functioning properly. Skipping this step can lead to errors like sending the wrong email, targeting the wrong user segment, or worse sending broken or unformatted content to live subscribers.
In Klaviyo, each flow includes a preview and test function. You can simulate how a user would enter the flow by clicking on the trigger block and selecting “Preview Trigger Setup.” If your trigger is list- or segment-based, Klaviyo will show you sample users who qualify. You can then send a test email to yourself or your team by clicking the email block and selecting “Send Test.” This helps you confirm that merge tags, dynamic products, and CTAs are rendering correctly.
Once you're confident that all components are working correctly, go back to the flow dashboard and click “Live” in the top-right corner to activate your automation.
- Preview flow trigger and sample users.
- Send test emails to check design and dynamic content.
- Simulate real actions (e.g., abandoned cart) to test metric triggers.
- Check flow on multiple devices before going live.
Step 10: Integrate Klaviyo with your WordPress website

- Install the Klaviyo Plugin: To integrate Klaviyo with your WordPress website, start by installing the official Klaviyo plugin. Log into your WordPress admin dashboard and navigate to the “Plugins” section, then click “Add New.” Use the search bar to find “Klaviyo.” Locate the official plugin by Klaviyo, Inc., and click “Install Now.” After installation, activate the plugin. This plugin automatically adds Klaviyo’s tracking script to your site, allowing it to capture visitor behavior, form submissions, and eCommerce events if WooCommerce is active. This plugin is best email marketing plugins for WordPress that helps foundation for syncing your website data with your Klaviyo account.

2. Get Your Klaviyo Public API Key: After installing the plugin, you need your Klaviyo Public API key to connect your WordPress site to your Klaviyo account. Log in to your Klaviyo dashboard and navigate to your account settings by clicking your profile icon in the bottom left corner. Select “Settings,” then “API Keys.” Here, you will find your Public API Key, which typically starts with “PK_.” Copy this key carefully because it allows your WordPress site to send visitor and customer data directly to Klaviyo, enabling accurate tracking and automation. Keep this key secure and only use it in trusted environments.

3. Configure the Plugin in WordPress: Return to your WordPress admin panel and open “Settings,” then select “Klaviyo.” Paste the Public API Key you copied from Klaviyo into the designated field within the plugin settings. This step links your WordPress site to your Klaviyo account. After pasting the key, click “Save Changes” to activate the connection. Once connected, the plugin will automatically inject Klaviyo’s tracking script into your site’s pages. It will also start syncing user behavior, form submissions, and eCommerce actions if applicable. This configuration enables your Klaviyo flows to trigger based on real-time user interactions on your WordPress site.

4. Enable WooCommerce Integration (If Applicable): If your WordPress site uses WooCommerce, the Klaviyo plugin can sync key eCommerce events to your account for advanced automation. To enable this, go to your WordPress dashboard and navigate to WooCommerce settings. Click the “Integration” tab, where you should find Klaviyo options. Make sure “Enable Klaviyo Integration” is checked. This setting allows Klaviyo to track important customer actions such as product views, cart additions, checkouts, and completed purchases. Syncing these events empowers you to run targeted flows like abandoned cart reminders or post-purchase follow-ups, directly boosting your store’s marketing effectiveness.
5. Test the Integration: Once you’ve set up Klaviyo in WordPress, it’s important to test that everything is working correctly. Open your website in a private or incognito browser window and perform typical actions like visiting pages, signing up through newsletter forms, or completing a test purchase if you have WooCommerce enabled. Then, log in to your Klaviyo account and check the “Activity Feed” to see if these actions are recorded as events such as “Viewed Product,” “Subscribed to List,” or “Placed Order.” If the events appear promptly, your integration is successful, and your flows will trigger based on real user behavior on your WordPress site.
Step 11: Monitor the Flow’s Performance
Once your Klaviyo automation is live, the next crucial step is to monitor its performance. Klaviyo provides a rich analytics dashboard that allows you to track how each part of your flow is performing. This includes key metrics such as email open rates, click-through rates (CTR), bounce rates, unsubscribe rates, and revenue attributed to each email. Monitoring these stats helps you understand what’s working and where adjustments are needed to optimize your automation. Also you can use various web analytics tools in order to track performance of you campaign.
To begin analyzing your flow’s performance, go to the Flows section in your Klaviyo dashboard and click on the flow you launched. You’ll see a visual representation of the flow with performance stats shown directly on each email and component. For each message, Klaviyo shows the number of recipients, opens, clicks, conversions, and revenue. This visual performance breakdown allows you to pinpoint strong and weak emails within the automation.
- Go to Flows > Select your live automation to access performance stats.
- Track opens, clicks, bounces, unsubscribes, and attributed revenue.
- Use A/B testing to improve subject lines, design, and CTAs.
- Analyze by segment to discover behavior differences.
Step 12: Optimize and Update Regularly
The final step in setting up a successful Klaviyo automation is ongoing: optimization and updates. Email flows are not a “set-it-and-forget-it” tactic. As your brand evolves, your product lines change, and your audience grows, your automation should reflect those shifts. Regularly optimizing your flows ensures they remain effective and aligned with your marketing goals.
Start by analyzing the data collected in Step 9. Identify emails with lower open or click-through rates and consider updating the subject line, preview text, or header image. If users are dropping off after a certain email, that could signal a message is too frequent, irrelevant, or poorly timed. Adjusting your time delays or content based on performance insights can help recover engagement.
Also, keep an eye on the subscriber experience. If users receive the same flow multiple times due to overlapping triggers or segments, it could lead to fatigue. Klaviyo allows you to configure flows so they only run once per user, or add filters to exclude certain customers. Revisiting these settings periodically helps maintain a seamless experience.
Lastly, experiment with new splits, conditional paths, and branching logic to hyper-personalize the journey. As your list grows and diversifies, one-size-fits-all emails won’t perform well. Customizing the flow path based on user behavior, order history, or preferences leads to higher engagement and conversions.
- Analyze performance regularly and identify areas for improvement.
- Adjust time delays, email content, and targeting settings.
- Update design, images, and offers seasonally or during promos.
- Add personalized paths and refine conditions to match audience behavior.
Conclusion
In today’s fast-paced digital landscape, effective communication can make or break a business. Email marketing automations provide a scalable, efficient, and highly personalized way to stay connected with your audience. From welcoming new subscribers and nurturing leads to retaining loyal customers and driving conversions, these automations play a pivotal role in every stage of the customer journey.
By integrating email marketing automations into your website, you gain the ability to deliver timely, relevant, and valuable messages without lifting a finger. They help streamline operations, maintain consistency, and provide data-driven insights that fuel continuous improvement.
As consumer expectations evolve, businesses must adapt and email marketing automations offer the perfect solution. They allow you to communicate smarter, not harder. Whether you’re a solo entrepreneur or a large enterprise, embracing automation is no longer optional it’s essential.
Start implementing email marketing automations today and watch how it transforms your business communication, boosts customer satisfaction, and drives sustained growth in the competitive marketplace.
Blogs Categories
Podcast WordPress Theme (Audio Podcast 2.0)

Latest WordPress Themes


Buy All our Premium Themes just at $119
