
How To Add A Photo Gallery in WordPress?
Photos on the website really attract you. Right?
Are you wanting to create a photo gallery in WordPress?
You feel fresh when looking at the images moving on the site and get stuck for a while to visit the site and see the content so that you can come to know what the website is exactly all about.
In short, photos and images play a vital role in fetching great audiences on a website. It’s a beautiful strategy to invite the audiences and engage them to scroll down the webpage and read the content for better reach worldwide.
Sometimes, promotional images can feel boring. But if you edit and make it collaborate with interesting content like exciting offers and catchy words, it would also work positively and excites users to get connected with.
A photo gallery is a collection of multiple images that appear and move one after another with grace and users do not have to scroll down every time to view various images.
In an image gallery, you can display images in a grid layout that consists of columns and rows. Also, you can show the thumbnails and users can click on them to expand them. So, in brief, we can say that gallery is a convenient way to accommodate more photos in less space and give the ultimate awesome look to the site.
Adding photos and different images to the website is very beneficial for professional purposes and it is very easy to insert into the site pages, blogs, and different posts when required.
If you are using WordPress as a CMS for creating a website, today, in this article, we will be discussing the steps to add a photo gallery to a website.
We consider that you must know WordPress which is the most popular platform for easy and quick website development. It has very useful and interesting design tools.
A built-in gallery feature is also present in WordPress. There is also a block editor that includes a gallery block that you can add in just a few clicks. Also, you can use a plugin that is specially made for creating an image gallery with advanced features.
So you can easily create a photo gallery on your website. But if you do not know about WordPress and how it works, you can find the WordPress installation and practice the beginner’s guide.
So let us go and get started to learn how to add a photo gallery in WordPress.
Firstly, let’s start with the default WordPress gallery block i.e. creating an image gallery without a plugin.
Go to the post and start to edit it that you wish to. Click on the Add New Block icon and select the Gallery block on the post-edit screen.

In this way, you can add the Gallery block to your WordPress editor. On this, can click the ‘upload’ button to upload photos from your computer. You can choose from previously uploaded photos in the media library.

You can select and open multiple images with the Ctrl key pressed on your keyboard when you click the ‘upload’ button.
Once you upload all the images, you can add captions to your images. Just click on the photos, and start to enter a caption in the ‘Write caption…’ field.
If you want to create a gallery, then click on the Media Library tab. Select images for your gallery all at once. Once you select images, you can enter the image alt text, title, and caption from the attachment details panel on the right side.
Quickly Get Photo Gallery In WordPress
You can get all these in a ready to use WordPress Template By VWThemes
Check Out VW Premium WordPress Themes
Click on the ‘Create a new gallery’ button to select and add images. And the image gallery will be added to your post.
You can edit the images through an ‘Edit Gallery’ option. In this, you can alter, add, and review your image captions. Once it gets done, click on the ‘Update Gallery’ option.

After this, you need to adjust the gallery block settings. There is a panel on the right side where you can select the number of columns for each row, enable or disable the Crop images option, and select where to link your gallery images.
You can select ‘None’ if you want your audiences only to view your photo.
If you select the Media File option, then the images can be clicked, and the image file will open when clicked. Similarly, the attachment page will open if you select the Attachment Page option.
Once you are done with all the settings, you can publish the post and preview the gallery on your live website.
Isn’t it fast?
It looks awesome too. Once start to create and add image galleries in WordPress, you will be observing that there must be some more advanced features added to it.
For example, users should view the gallery again and again when they click on the back button.
The gallery should be interactive and user-friendly. Its appearance should rely on the design of the theme and shouldn’t follow a general design of a similar style or pattern.
In this, you can’t sort or organize your galleries into albums or tags. You cannot save the gallery to use it in future projects. You have to recreate the other. So to overcome these all problems, you will need some special or advanced method for creating a photo gallery in WordPress. So, let us understand method number 2. How to use plugins for creating photo galleries in WordPress.
So let’s start to understand how to create a photo gallery in WordPress with plugins.
Plugin installation with WordPress Plugin Search
It is the easiest way to a WordPress plugin installation. But it has a limitation of using only plugins in the WordPress plugin directory which consists of only free plugins.
Open a dashboard.
Select ‘Plugins’-> Add new.
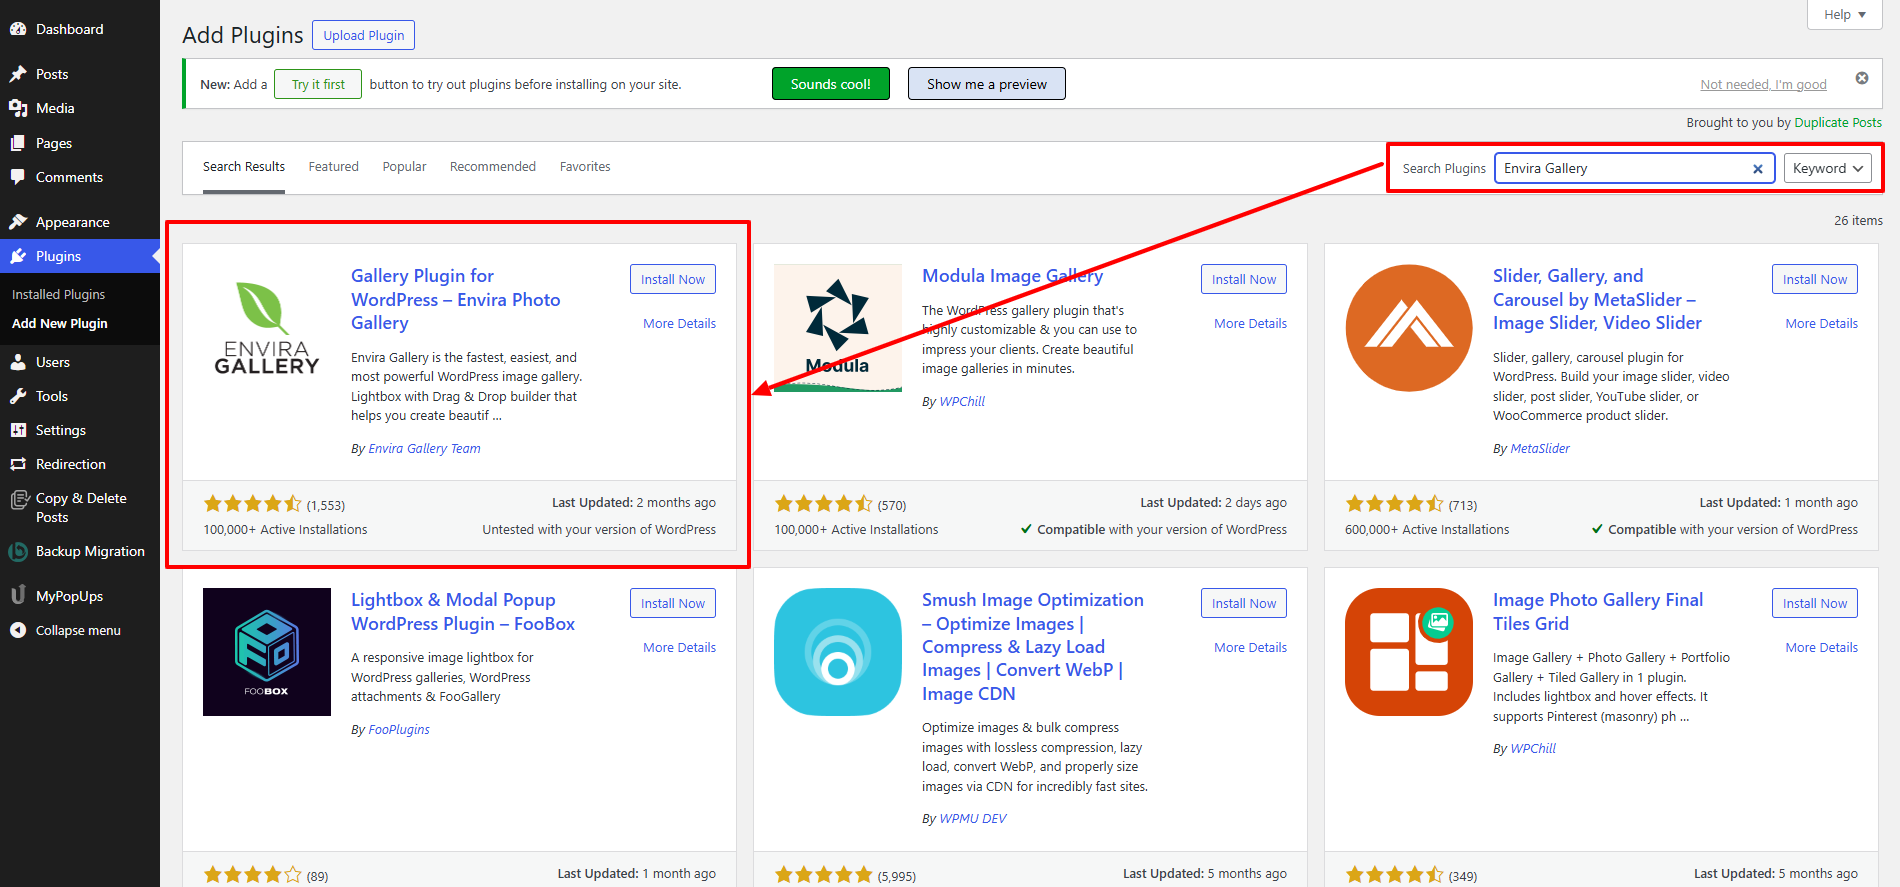
Type the plugin name in the search plugin text box and find the option. After that, you will see a list of different plugins. You can find the image gallery plugin here. Here we have taken an example for forms. WordPress has a wide range of image gallery plugins too.
Pick the plugin that is best and require for your site. Press the ‘Install Now’ button next to it.
WordPress will download and install the plugin. After this, you’ll see a ‘Activate’ button in front of the installed plugin. Once you click on the ‘Activate’ button, you can start using the installed plugins.
Recommended image gallery plugins in WordPress
If you want to use a plugin for inserting an image gallery into your website, here we are recommending the top 10 WordPress image gallery plugins which are updated and getting positive reviews from clients. You can pick any and start using it.
- Envira Gallery.
- Modula.
- NextGEN Gallery.
- FooGallery.
- Photo Gallery by 10Web.
- Gmedia Photo Gallery.
- Jetpack.
- Responsive Lightbox and Gallery.
- Photo Gallery by Supsystic
- All-in-one Video Gallery.
From this, the NextGEN Gallery plugin is a top-rated, heavy, stylish, and highly updated WordPress plugin. All the listed plugins are widely used and recommended by experts. But NextGEN is the most popular.
We compared these all plugins in terms of their speed, ease of use, features, compatibility, and overall price of each plugin and decided to give a demo with the Envira Gallery plugin.
Envira Gallery is the foremost WordPress gallery plugin for images and videos. It is stand out against the other plugins just because of its flexibility, customizable features, templates, and user-friendliness. It is the best choice for larger business websites and offers free as well as premium versions. High-cost image plugin is committed to quality products for enhancing the website’s overall performance.
Install and activate the Envira Gallery plugin.
Visit the Envira Gallery » Settings page to enter your license key. You can receive this key from your account on the Envira Gallery website.
Go to Envira Gallery » Add New page to create your first gallery.
Give a title for your gallery and then click on the ‘Select files from computer’ button to upload your images.
Also, you can select files from your WordPress media library by clicking on the ‘Select files from another source button.
After the successful image upload, it will appear in the Gallery section.
You can edit the image details like tiles, alt text, captions, etc.
And change the other settings like margins, thumbnail sizes, image dimensions, etc. For this, once you uploaded all the images in the gallery, you will see a ‘Configuration’ tab. Click on that tab and change all the settings as-
If you want to pop up your image in a large size box, you can click on the ‘Lightbox’ option.
Here you can update the setting in which form your images should open and look in front of the user on the website when they click on it.
Next, you can see the ‘Mobile’ tab which is used to configure your gallery settings for mobile devices. It permits you to select image dimensions for mobile devices, enable or disable lightbox, and more.
You will find more options in the ‘Misc’ section. You can try any and publish your gallery anywhere on your WordPress site.
Click on the Add New Block icon and select the Envira Gallery block, if you want to edit a post or page where you want to display your gallery.
It will add the Envira Gallery block in the post editor. You can search for a gallery by its name or find it by clicking on the dropdown arrow icon.

The plugin will load your gallery in the editor. One more thing before you start to install plugins, if you are using wordpress.com for your website, then you cannot install plugins as it has limitations and users cannot view the plugins menu on the dashboard. So you have to install plugins on your self-hosted website on wordpress.org. You can move your site from weordpress.com to wordpress.org easily.
Creating Photo Gallery In WordPress using a theme
Creating a photo gallery in WordPress using the Stock Images WordPress Theme is an effortless way to showcase stunning visuals. This theme, paired with WordPress’s user-friendly tools, allows you to design professional and captivating galleries without any technical expertise. Whether you're displaying stock photography, portfolio images, or creative artwork, the Stock Images theme ensures a seamless integration of visually appealing layouts and responsive designs. Follow our step-by-step guide to create a photo gallery that enhances your website's appeal and engages your audience effectively.
How to Create a Photo Gallery in WordPress Using Stock Images WordPress Theme by VW Themes
VW Stock Images WordPress Theme
The VW Stock Images WordPress Theme is a modern, responsive solution designed for photographers, stock image platforms, and creative professionals to showcase stunning visuals. Featuring dynamic image galleries, customizable layouts, and built-in SEO optimization, it ensures your portfolio stands out online. With fast loading speeds, WooCommerce integration for easy monetization, and a mobile-friendly, cross-browser compatible design, this theme provides a seamless user experience. Whether creating a photography website or an online image store, the VW Stock Images WordPress Theme combines style, functionality, and performance for a professional online presence.
Step 1: Install and Activate Stock Images WordPress Theme

- Purchase and download the Stock Images WordPress Theme from VW Themes.
- Log in to your WordPress dashboard.
- Navigate to Appearance > Themes and click Add New.
- Upload the downloaded theme file, click Install, and then activate it.
- Once activated, access the theme options under Appearance > Customize to configure initial settings.
Step 2: Install and Activate a Gallery Plugin
- Go to Plugins > Add New in your WordPress dashboard.
- Search for a reliable gallery plugin like Envira Gallery or NextGEN Gallery.
- Click Install Now and activate the plugin.
- Once activated, a new menu for the plugin will appear in your dashboard.
Step 3: Create a New Gallery

- Navigate to the gallery plugin's menu (e.g., Envira Gallery > Add New).
- Name your gallery and click the Upload Files button to add your stock images.
- Customize your gallery settings, including layout (grid, masonry, or slideshow), image sizes, and captions.
- Save the gallery to generate a short code or embed code.
Step 4: Embed the Gallery in a Page or Post

- Go to Pages > Add New or edit an existing page where you want the gallery displayed.
- Use the block editor and add a Short code block.
- Paste the generated short code from your gallery plugin into the block.
- Preview the page to ensure your gallery is displayed as intended.
- Publish or update the page to make it live.
Step 5: Optimize and Customize for Stock Images Theme

- Use the Stock Images WordPress Theme customization options under Appearance > Customize to style the gallery page.
- Adjust colors, fonts, and layouts to match the theme’s design.
- Ensure your gallery is mobile-friendly and loads quickly by optimizing image sizes.
- Preview your site to ensure the gallery integrates seamlessly with your theme.
Conclusion
Creating a photo gallery in WordPress is a straightforward and effective way to enhance the visual appeal of your website and engage your audience. Whether you use the default WordPress gallery block, a feature-rich plugin, or a specialized WordPress theme like the Stock Images WordPress Theme, you have multiple options to achieve a professional look with ease.
If you're looking for a cost-effective solution to expand your website's functionality and design options, consider investing in a WP Theme Bundle. These bundles offer access to a wide variety of premium themes tailored to different niches, including photography, portfolio, blogging, and more. With a WP Theme Bundle, you can easily find themes that come pre-equipped with gallery features and stunning layouts, saving you time and effort.
Photo galleries not only save space but also create a dynamic browsing experience, allowing users to enjoy your content in an interactive manner. By following the methods and recommendations provided in this guide, you can showcase your images in a way that complements your website's design and purpose.
Start experimenting with different layouts, plugins, or themes to find what best suits your needs. A well-designed photo gallery, paired with the right WordPress theme from a bundle, can make your website more engaging, visually appealing, and memorable to visitors. So go ahead and add that stunning gallery to your WordPress website today!
FAQs
1. What is a WordPress photo gallery?
A WordPress photo gallery is a feature that lets you display multiple images in an organized grid, slider, or masonry layout. It helps improve the visual appeal of your website.
2. How do I create a WordPress image gallery?
You can create a WordPress image gallery by using the default block editor gallery block or installing a gallery plugin for advanced layouts, lightbox effects, and filters.
3. Which is the best WordPress photography gallery plugin?
The best WordPress photography gallery plugin depends on your needs. Popular options include Envira Gallery, NextGEN Gallery, and Modula for professional image displays.
4. Can I add comments to a WordPress photo gallery with comments?
Yes, many gallery plugins allow users to comment on individual photos. This is useful for photographers, portfolios, and community-based websites.
5. How do I add a photo gallery in WordPress without coding?
You can add a photo gallery in WordPress without coding by using drag-and-drop gallery plugins or the built-in gallery block inside the WordPress editor.
6. What is Photo Cart WordPress used for?
Photo Cart WordPress is commonly used for selling photos online, managing client proofs, and allowing users to purchase digital or printed images directly from your website.
Blogs Categories
Podcast WordPress Theme (Audio Podcast 2.0)

Latest WordPress Themes


Buy All our Premium Themes just at $119
