Install WordPress using FTP : WordPress is a popular Content Management System for its easy installation with fewer configurations and settings. WordPress Installation is a very straightforward process where you won’t have to deal with any complexities or face any trouble. It takes several minutes to get connected to the server. Currently, there are web hosting providers are offering tools for automatic WordPress installations.
WordPress can install directly from its official website and can be installed using FTP. Today, in this article, we will be guiding you through the most simplified method of WordPress installation using FTP where you can easily edit, add, and transfer the website files and connect to the hosting server easily.
First, you need to understand some basics about FTP. So, let’s start.
What is FTP?
FTP is a File Transfer Protocol used for transforming website files from your personal laptop to the server directly. It’s a medium that works between the client and the server. It controls the flow of data between the client and server. Using FTP, you can alter the code of the file directly instead of handling the functions through Dashboard.
What are the different Functions of FTP?
- Move
- Copy
- Upload
- Download
- Rename
- Delete
What are the benefits If You Install WordPress using FTP?
- Multiple files and directories can transfer.
- Resumes the transfer if the connection gets failed in between.
- You can schedule the file transfer.
- Zero file size limitation.
- Files are kept in the queue to be downloaded or uploaded.
- Mia files get uploaded rapidly.
- Easy plugin installation
- Easily diagnose the error.
Now let’s learn How to access WordPress using FTP?
You got the concept of FTP. Now let’s move forward to understand how to install WordPress using FTP. For this, we require FileZilla.
Again the question arises What is FileZilla?
If we are talking about the protocol, then there must be an intermediate over which FTP could transform the WordPress website files and store them on the server. So FileZilla is that intermediate platform. It’s a free and open-source application tool that permits users to configure an FTP server and connect to the other one for file exchange.
I hope you got the concept behind Filezilla and its use in WordPress installation using FTP. Now, from here we will be guiding you through the WordPress installation steps using FTP. So let’s get started-
Step 1: Back up your website files.
Let us tell you a very important note FTP makes the changes directly in your code while transferring files. If you are not aware of it, you may have to face any issues. So keeping a backup of your original website files will be better if something goes wrong and you would have to restore all the files.
So, take a backup for core php files and database along with the themes, plugins, and media.
You can take backup with the help of third-party backup plugins.
Step 2: Install Filezilla
After taking the backup, go to the official website of FileZilla and download the FileZilla client. You can download the server if you want to transfer the file to others.

FileZilla detects an operating system in your laptop. If you don’t find the right version, you can see the different links on the site related to other operating systems. You can download the versions as per the OS installed in your system.

Double-click the FileZilla installer file and run it. Follow the steps that will be appearing on the screen to complete the installation process. Once it gets installed successfully, you can find its icon which indicates that it is to run as an application. Click the FileZilla icon and run the client.

When you open FileZilla opens, you can view-
The local site files (all the files on your computer)
The remote site files (the website files saved on your server)
Right-click on the FileZilla icon for editing, transferring, adding, and deleting files. It will allow you to move the files to different locations by dragging and dropping them.
Step 3: Connection with the host server by using FTP.
When a FileZilla window will open, you’ll see that the remote site is “Not connected to any server.” The remote site is the server-side space where you can store all your files related to the website get stored. You need to connect to the server in order to execute them.

For this, you will need the FTP credentials-
- The web host’s FTP address
- FTP username
- FTP password
- The port used by your host for FTP
——————————————————-
You can receive this from your web hosting service provider company. It may vary as per the service-providing company.
Just log into your hosting control panel and find the credentials in your personal account information. Most of the time, all the credentials come with the documentation. But if not, you can directly contact the providers.
Quick WordPress Hack –
You can get all these in a ready to use WordPress Template By VWThemes
Check Out VW Premium WordPress Themes
Once you receive the credentials, you have to copy and paste them into FileZilla and click on the Quickconnect option.
However, many times you need to connect via SFTP in the Site Manager of FileZilla. For that, click on the Site Manager button at the top left corner of FileZilla.

Paste in the credentials in each corresponding field like Host, Port, User, and Password. Leave the other fields on default settings and Click the Connect button.

You will see a ‘Successful’ message once the connection gets established. and your website files will populate under the Remote Site section to the right.

Step 4: Install WordPress
After a successful FileZilla connection to your web server, you have to move the local files and remote files. To install WordPress into a main domain, select and upload to /public_html/directory.
To Install WordPress into a subfolder, select and upload to /public_html/foldername.

On the upper right panel, you will find a folder named public_html or www where all your site’s data gets stored. Open that folder. Then the /public folder, to access your main site files.
You can place all your files in/wp-content folder.

Step 5: Log in to your cPanel.
Navigate the hosting control panel and log in with the cPanel login information from your hosting company.
Go to the My SQL database button.
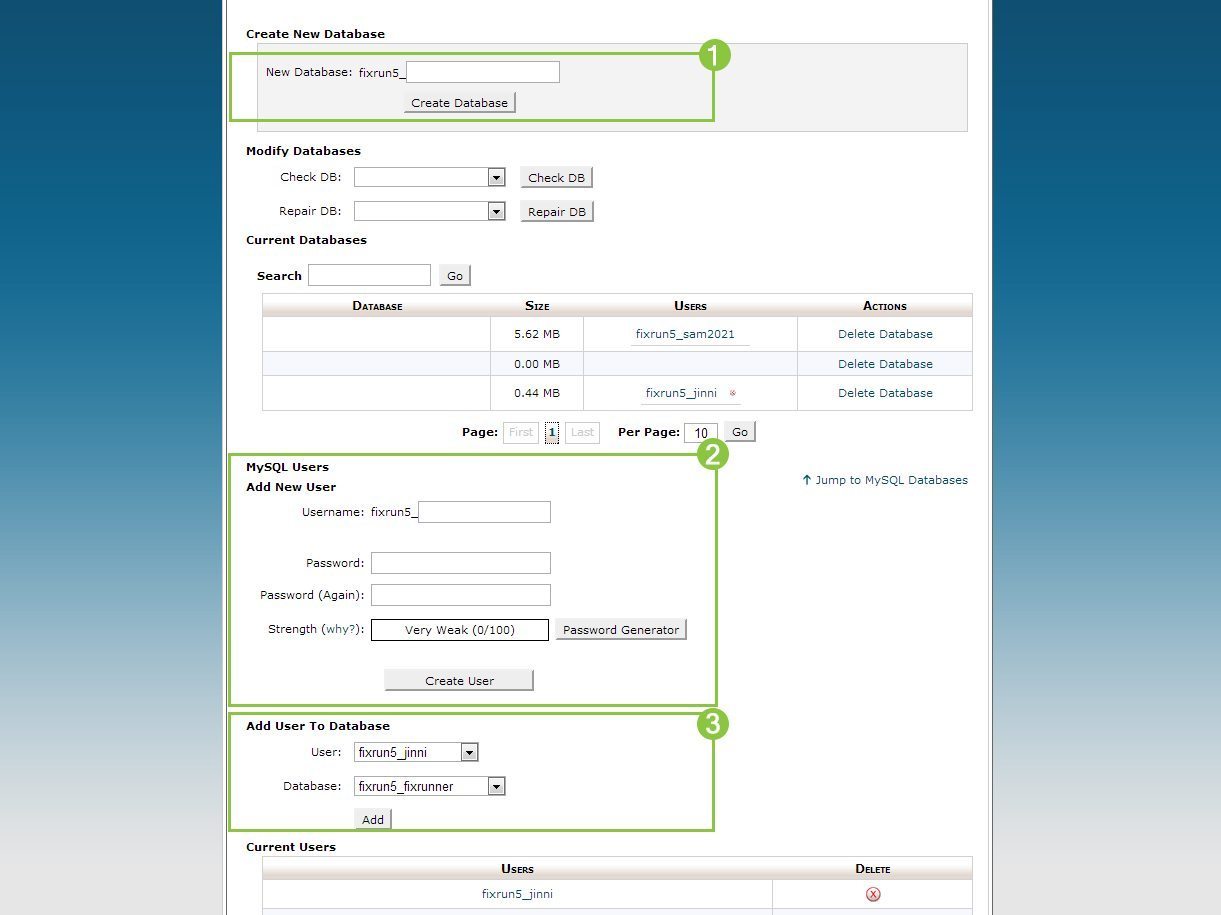
Step 6: Create a database
Enter the details like the database name on the “new database” field and click on “Create Database.”
After this, you will need to fill in your username and password. Click on “Create user.”
Under “add a user to database” you have to choose the user and the database that you create earlier. Click on the “add” button.
[holo_list size=”small”]
[holo_list_item icon=”icon-info”]We Reccomend[/holo_list_item]
[/holo_list]
keep the records of the database information.

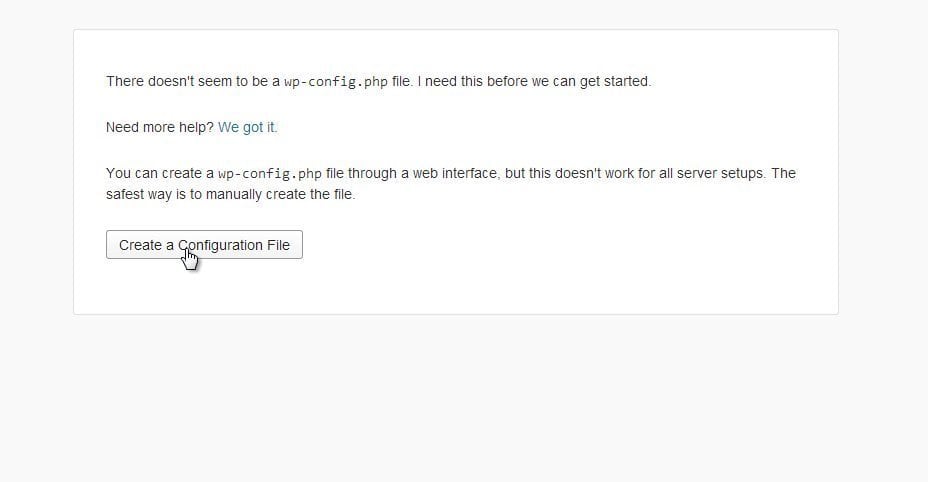
Step 7: Run the install by finding the URL for the directory where you uploaded WordPress.
Step 8: Click on the ‘Create the configuration file’ option.

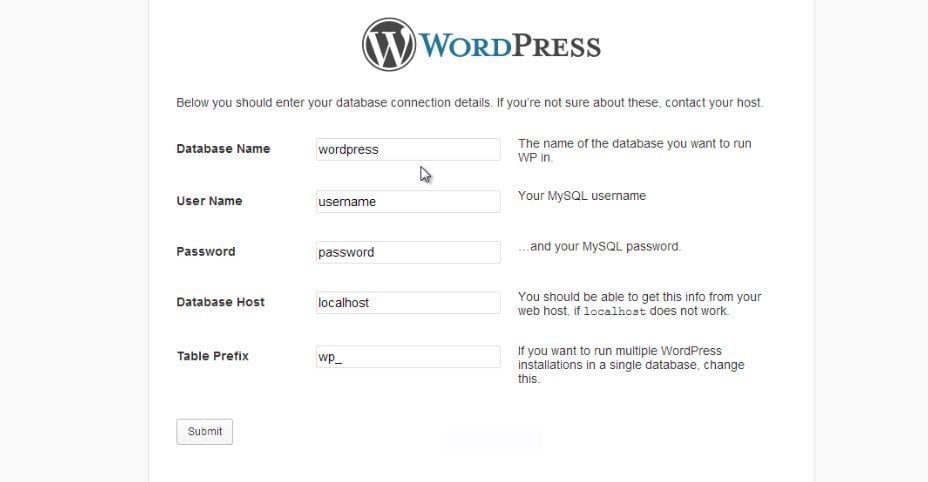
Step 9: Click on the “Let’s Go” button and input the following information:
- A name for the database
- A username and password

Step 10: Click the “Submit” button.
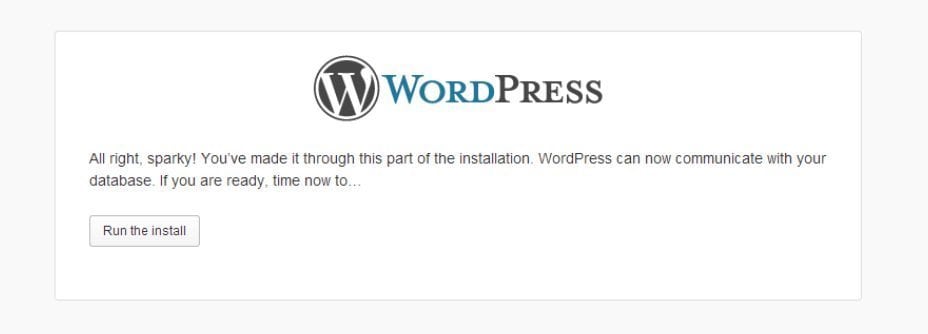
Step 11: Click on “Run the Install.”

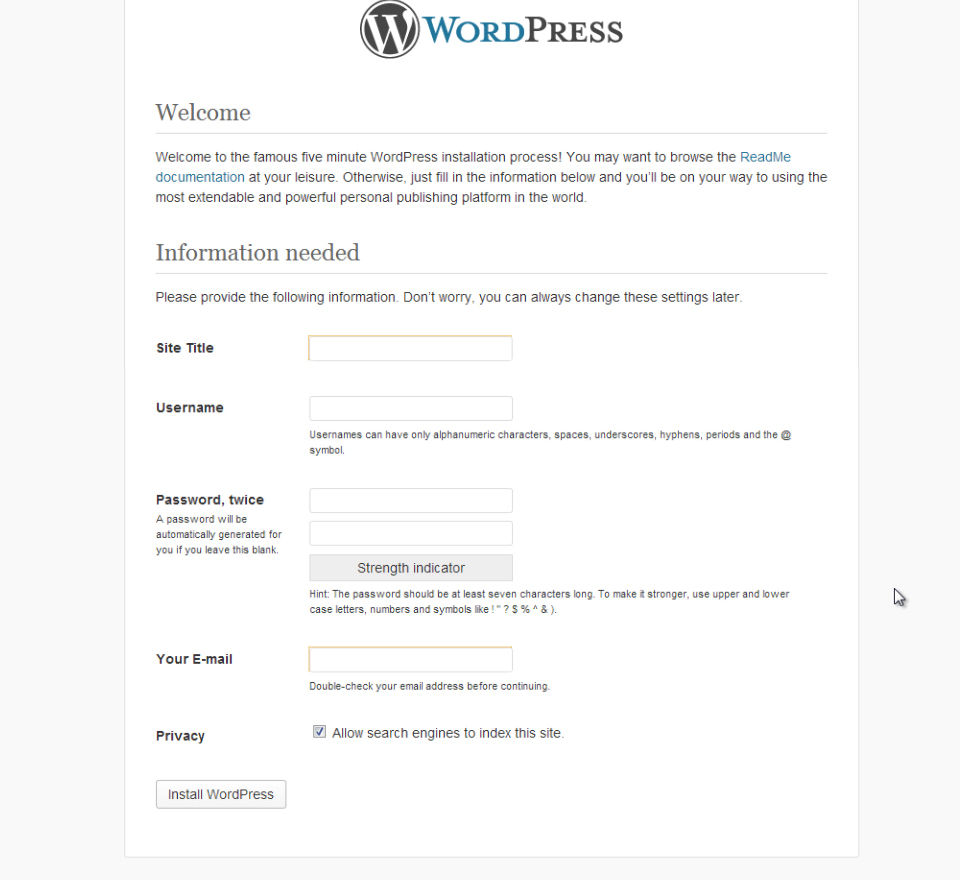
Step 12: Now it’s time to enter the details of your website which include- the title of your site, username, password, and email address.

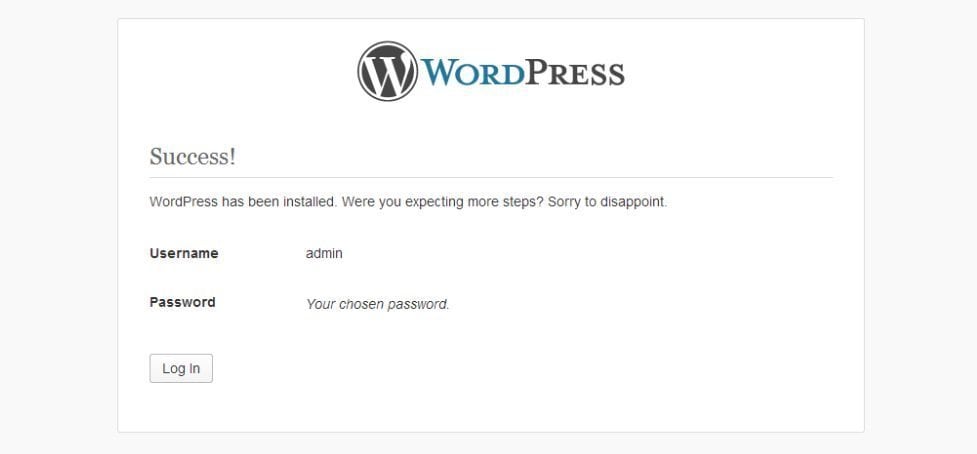
Step 13: Click “Install WordPress”. Once WordPress gets installed in the system it will ask for a username and password.

Step 14: Login with the username and password and start to write your blog or WordPress website.
Congratulations!
And that is the complete guide to installing WordPress using FTP. We hope you all will enjoy the guidelines that we have tried to make the WordPress installation using FTP easier for you. It’s a great process of learning WordPress includes many concepts. FTP let you work directly with the files which makes the website development fast.
In this blog, we studied FTP, FileZilla, Site backup, connecting to the host server using FTP, and managing WordPress.
Still, you can have the other two alternatives SFTP and FTPS to FTP. You can study them and consider accessing and transferring files on WordPress.


