In the modern times, where the majority of people turn to the internet for information and services, having a strong online presence is imperative for businesses across all industries. Dental clinics, despite being traditionally brick-and-mortar establishments, are no exception to this rule. A well-designed Dental clinic website serves as the digital storefront for practice, offering a gateway for patients to learn about services, book appointments, and access important resources.
One of the most powerful tools for creating such a website is WordPress. WordPress powers over 40% of all websites on the internet, making it the most widely used content management system in the world. Its popularity stems from its ease of use, flexibility, and extensive range of themes and plugins tailored to various industries and purposes.
Nowadays, patients expect more from dental websites than just basic information. They seek an immersive online experience that not only informs but also engages and reassures them about the quality of care they’ll receive. Therefore, a dental website should be more than just a digital brochure – it should be a dynamic platform that educates, inspires trust, and facilitates seamless interactions.
Key Points to Consider For Creating a Professional Dental Clinic Website:
- User-Friendly Design: The website should have a clean, intuitive layout that is easy to navigate, regardless of whether visitors are using a desktop computer, tablet, or smartphone. Responsive design is crucial to ensure optimal viewing experience across all devices.
- Compelling Content: High-quality, informative content is essential for engaging visitors and establishing the clinic’s expertise. This may include detailed descriptions of services offered, informative blog posts on dental health topics, patient testimonials, and educational videos.
- Visual Appeal: Incorporating visually appealing elements such as professional photography, graphics, and videos can enhance the website’s aesthetic appeal and make it more engaging for visitors. Images of smiling patients and the clinic’s modern facilities can help convey a sense of trust and professionalism.
- Online Appointment Booking: Integrating an online appointment booking system allows patients to schedule appointments conveniently without having to call the clinic. This feature not only improves the patient experience but also streamlines administrative processes for the clinic staff.
- Patient Resources: Providing valuable resources such as FAQs, dental care tips, post-treatment instructions, and downloadable forms can empower patients to take better care of their oral health and make informed decisions about their treatment.
- Integration with Social Media: Connecting the website to the clinic’s social media profiles enables patients to stay updated on news, promotions, and events. It also facilitates social sharing, allowing satisfied patients to spread the word about their positive experiences.
- Search Engine Optimization (SEO): Implementing SEO best practices ensures that the website ranks well in search engine results, making it easier for potential patients to discover the clinic online. This includes optimizing content for relevant keywords, improving site speed, and obtaining quality backlinks.
What to Add in a Dental Clinic Website?
Before diving into the technical aspects of building your website, it’s crucial to understand what elements are essential for a dental website. Here are some key components to consider:
- Home Page: Create a welcoming homepage that highlights your clinic’s services, expertise, and any special offers.
- About Us: Introduce your team of dentists, hygienists, and staff members. Share your clinic’s mission, values, and commitment to patient care.
- Services: Provide detailed information about the dental services you offer, such as general dentistry, cosmetic procedures, orthodontics, and more.
- Patient Resources: Offer valuable resources for patients, including FAQs, dental care tips, post-treatment instructions, and downloadable forms.
- Testimonials: Showcase positive testimonials and reviews from satisfied patients to build trust and credibility.
- Contact Information: Make it easy for patients to reach you by including your clinic’s address, phone number, email address, and a contact form.
Steps to Create a Dental Clinic Website in WordPress
Now that we have a clear understanding of what our dental website needs, let’s dive into the step-by-step process of creating it using WordPress:
1. Select Domain Name & Hosting Service:
The first step is to choose a domain name that reflects your clinic’s name or services. Next, select a reliable hosting service to host your website. Popular options include Bluehost, SiteGround, and HostGator.
Once you’ve chosen a hosting provider, you’ll need to set up a domain name and hosting account. A domain name is the web address that visitors will use to access your website (e.g., www.yourclinicname.com). Most hosting providers offer the option to register a new domain or use an existing one if you already have one registered elsewhere.
After selecting a domain name, you’ll need to choose a hosting plan and complete the registration process. This typically involves providing personal and payment information, selecting additional features (such as SSL certificates), and choosing a billing cycle.
2. Install WordPress:
Installing WordPress is a straightforward process, especially with the user-friendly tools provided by most web hosting services. With your hosting account set up, you’re now ready to install WordPress. Many hosting providers offer one-click WordPress installations, which automate much of the setup process. Here’s a step-by-step guide to installing WordPress in just three simple steps:
- Log in to your hosting account’s control panel (often called cPanel or a similar name).
- Look for the “WordPress” or “Website” section and locate the WordPress installer tool.
- Click on the WordPress installer tool and follow the prompts to complete the installation process. You’ll typically need to select the domain where you want to install WordPress, choose a username and password for your WordPress admin account, and customize other settings as desired.
Once the installation is complete, you’ll receive a confirmation message with a link to access your WordPress dashboard. From there, you can begin customizing your website, adding content, installing themes and plugins, and much more.
3. Install and Activate Your Theme:
Installing and activating a WordPress theme is a fundamental step in customizing the appearance of your website. Before installing a theme, you need to choose one that suits your dental clinic website aesthetic and functional requirements. You can browse and select themes from the WordPress Theme Directory or buy WordPress themes from reputable theme providers like VW Themes. Once you’ve chosen a theme, download the theme files to your computer. Themes are typically downloaded as ZIP files.
Our one of the best selling theme for dentist website is Dentist WordPress Theme. This theme is specifically designed for dentist and professional dental care taker. It is one of the finest theme for doctors. With sleek design and reliable functionalities, this theme excel in the medical world. So why wait? buy theme now!
After downloading the theme files, you can upload and install the theme directly from your WordPress dashboard. Here’s how to do it:
- Log in to your WordPress admin dashboard.
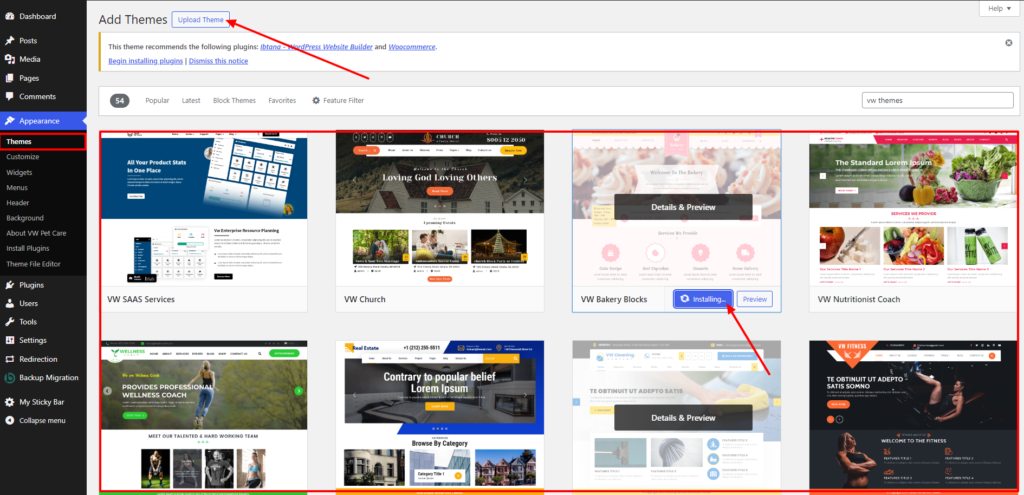
- Navigate to “Appearance” > “Themes” from the sidebar menu.
- Click on the “Add New” button at the top of the page.
- Next, click on the “Upload Theme” button.
- Choose the theme ZIP file you downloaded earlier from your computer, and click “Install Now.”
- WordPress will upload the theme file from your computer and install it on your website. Once the installation is complete, you’ll see a success message.
After installing the theme, you need to activate it to apply it to your website. Here’s how to activate your newly installed theme:
- From the “Themes” page, find the newly installed theme among the list of available themes.
- Hover over the theme thumbnail and click the “Activate” button that appears.
WordPress will now activate the theme, and you’ll see a confirmation message indicating that the theme has been successfully activated. Your website’s appearance will be updated to reflect the design and layout of the newly activated theme.
4. Import Demo Content:
Many WordPress themes come with demo content that you can import to kickstart your website design. Follow the theme’s documentation to import demo content, including pages, images, and layouts.
5. Customize the Content as per Requirement:
Personalize your website by customizing the imported content to match your clinic’s branding, color scheme, and imagery. Update text, upload your logo, and add relevant images to make your website unique.
6. Install and Activate WooCommerce Plugin:
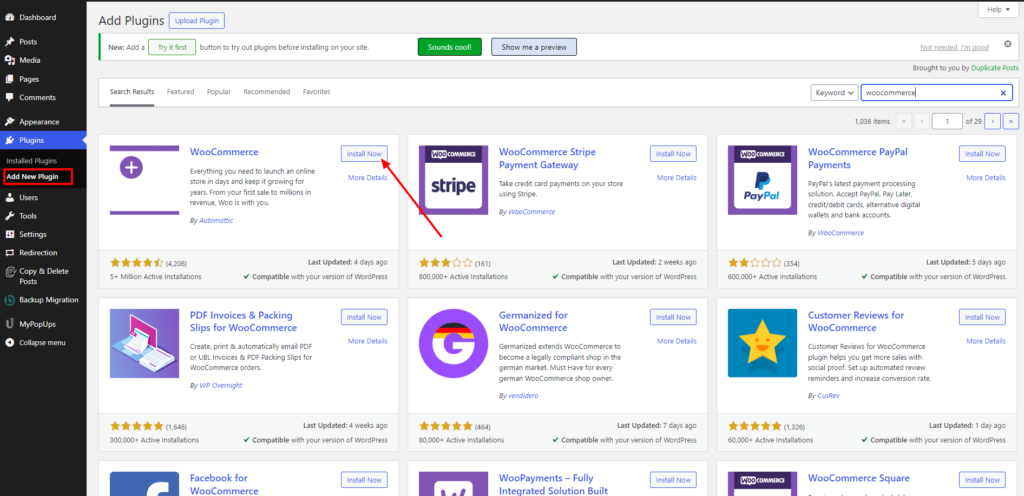
If you plan to sell dental products or services online on your dental clinic website, install the WooCommerce plugin. This powerful e-commerce solution integrates seamlessly with WordPress and allows you to set up an online store with ease.
7. Add Products:
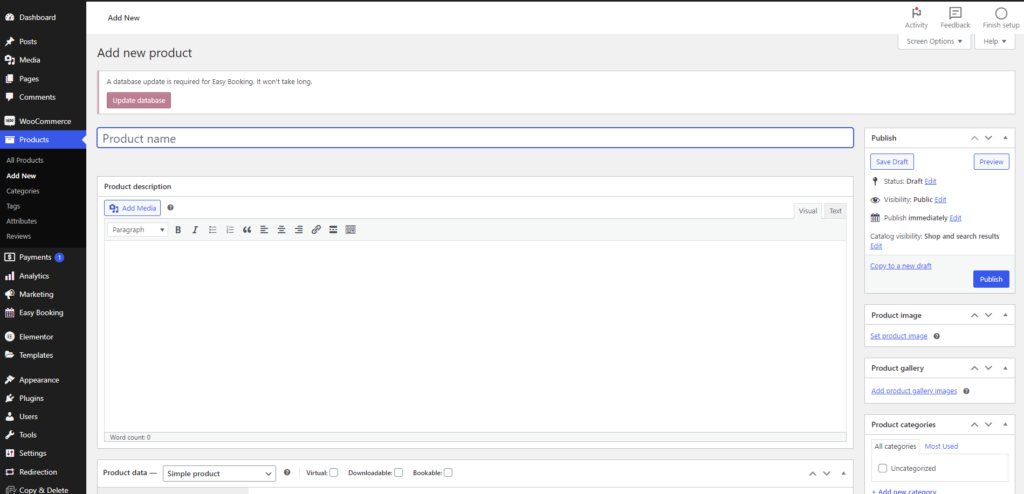
Add dental products or services to your WooCommerce online store, including toothbrushes, toothpaste, dental appliances, or even virtual consultations. Set prices, descriptions, and images for each product/service.
8. Launch Your Website:
Once you’ve customized your website to your satisfaction and added all necessary content, it’s time to launch it to the world. Double-check all links, forms, and functionalities to ensure everything is working correctly before making your website live.
Conclusion:
Crafting a professional dental clinic website need not be daunting, thanks to WordPress’s user-friendly tools. By adhering to the step-by-step guide provided, you can construct a visually engaging, informative, and efficient platform. This approach ensures not only the attraction of new patients but also the bolstering of your clinic’s online visibility. So, dive in, leverage the resources at your disposal, and begin shaping your dental clinic website today! With WordPress’s intuitive interface and customizable features, the process becomes a seamless journey towards establishing a robust online presence for your practice. Take charge, unleash your creativity, and watch as your website becomes a vital asset in connecting with patients and showcasing the excellence of your dental services.
Create your dental clinic website effortlessly with WordPress using our comprehensive WP theme bundle. This bundle includes customizable themes designed for dental practices and other niches as well, along with essential plugins and step-by-step guides. Elevate your online presence and attract more patients with professional design, appointment booking functionality, patient education resources, and much more.


