Introduction
Are you looking to bring your brand to the web with a strong web appearance? I know you must be thinking of creating a website for selling products online. Great! You should take this step to bring out the best in your brand. The internet creates a separate space for your brand with a unique identity and customers, too. And why not, when customers today are much more into the internet?
That is what you need for your business: the right growth and perfect recognition. Yes, you can bring out your brand on the web with a website that shines. Well, the thought alone cannot help in this. You need to know how to create a website for selling products with a perfect plan to execute.
Luckily, there is no need to approach others, as you can do it. Yes, by visiting this blog, you will be ready to create a personalized website on your own. Before that, let’s know more about website creation for selling products.
Benefits of Creating a Website for Selling Products Online:
An online store, or e-commerce store, is the place where brands present their products for selling and buying. Simply put, an online store is the exchange of buying and selling products on the web. And this comes with a lot of benefits. Here are some of the benefits you must know before you create a website for selling products.
1. Better market reach
No doubt, getting an online platform is a gateway to so many new opportunities to expand your business. You get to connect with a global audience, which results in increased market reach.
2. Easy accessibility for end users
You know, people are more active on the web than in physical stores. They find the products just by tapping and clicking at home. Convenience is the reason why people opt for online products.
3. 24/7 availability and flexibility
Offline markets have fixed working or selling hours, but not the online store. Here, you can browse and order products anytime and from anywhere in the world. This makes end users stick to the online market more than visit offline stores.
4. Cost-Effectiveness
An online store is as cost-saving as a traditional store; you eventually save on so many additional costs. You need to spend on rentals, staff services, and other utilities to run the offline store. With the online store, these costs are cut down, and you can solely handle your site.
Things to Ensure Before You Create a Website for Selling Products Online
Getting a website is not just a task, you need to know the prerequisites. This helps in a perfect website creation.
1. Define the business goal and the target audience.
Before getting your online store designed, make sure you have the right goal for your online store. Decide on which products you are selling and which type of audience to target. Once you are thorough with this, web design is the easiest thing for you. For example, you are selling books online, so your target audience will be book lovers. Or those having libraries and book rental businesses.
2. Select the right content management system.
With the right CMS platform, your business can set greater boundaries. It is essential to place your online store in certified hands to achieve the desired goal. This can help your business flourish well on the web.
The web is full of CMS platforms giving true or false promises, but you need to choose the right one. Among the popular CMS like Drupal, Joomla, WordPress, and Magento, choosing the right one is crucial. You must look for ease of use, security, scalability, price, and more such factors.
Don’t get confused; today, WordPress is the most effective and high-end CMS to get your niche websites designed well. Along with this, it is highly necessary to choose the right e-commerce platform. Among the best platforms like Bigcommerce, Wiz, Woocommerce, and Shopify, Woocommerce is the most recommended one.
3. Competitive Analysis
While enrolling on the web for your business, one of the pivotal steps is to do a competitive analysis. This helps you know about your rivals and what strategies they have used in their businesses. Even so, it can help your business plan ahead and be creative. Your niche will serve you better than your competitors and more business strategies can be developed.
How to Make a Website for Internet Product Sales?
So, to create a website for selling products requires paying attention to some of the vital steps. Here is the list of steps you need to know while heading for an online store creation:
- Get a domain and hosting.
- Install WordPress
- Get a good WordPress theme.
- Install WooCommerce and other essential plugins.
- Add vital pages.
- Add Products
- Customize your store.
- Market your store.
1. Get a domain and hosting service.

You are on the first podium to get a website ready for selling products online. The first step is always getting web hosting and domain name for your site. You can say these are the two base pillars of your website. In short, the domain is the unique address of your site, and the hosting is the home of your site.
Domain Name:
A domain is the unique address that users input on the web to reach you. This unique address mostly holds the brand name so that users will easily remember you. Your website’s domain starts with “www” and ends mostly with ".com," ".co,” and ".in."
You can easily register for your website domain by using domain registrars like Bluehost, NameCheap, and GoDaddy. While getting your domain, make sure your domain is not confusing the users. It should be easily spelt and easy to remember. You cannot use special characters or uppercase letters in it.
Hosting Services:
When talking about a hosting service, it is the ultimate space where all your website data files are stored. It works like a home for your website, wherein it provides a separate server for your site to run on the internet.
Like domains, there are also various hosting services on the market. You need a certified hosting service that boosts your website’s speed and performance. Good uptime, great resources, and a content delivery network are the aspects to look into.
The certified hosting must be updated with the latest PHP and HTTPS versions. Interestingly, most of the hosting services come with a free domain name too.
And out of so many hosting providers, Bluehost came to the top of the list of suggestions. So, Bluehost is the most popular and well-certified hosting provider in the market. This provider complies with every detail so that your site has boosted speed and performance.
Steps to Start Hosting Services for your Website:
- To start with the hosting service, you need to reach the official website of Bluehost. On the homepage, tap the Get Started button to view the hosting plans on the next page.
- The next page lists the blocks of different hosting plans that you need to choose from. There are the basic, choice plus, online store, and pro plans. Note that all plans have a free domain for a complete year.
- The best plan is the online store plan, but if you are a startup or a small business, you can go for the basic plan.
- Once you have chosen the plan, tap the Select button under it.
- The next page is the domain selection page. Wherein you are allowed to either go for a new domain or use the existing one.
- Once done, then comes the final checkout page, where you will need to fill up the necessary details. It includes the account and billing information and finally completes the purchase.
- Once you have completed the purchase, Bluehost will send you a complimentary email with the necessary login credentials. It includes the username and the password.
2. Install WordPress

You have purchased the Bluehost plan with a mail containing the login credentials. Now is the time you need to install WordPress. Installing WordPress is just made easier with Bluehost, as it automatically installs for you. Yes, you simply need to reach the Bluehost control panel, and you will see that WordPress is already installed. You simply need to tap the Log in to WordPress button at the top right corner. This will ask you to simply enter your login details. After giving the login details, you are on your blank WordPress website. Now you can mold it to your needs.
3. Choose the Perfect WordPress Theme
When you have installed WordPress the right way, the next step is to shape up your website and make it look alive. For this, you just need a theme that shines out the best.
A WordPress theme is a set of templates, features, and plugins combined for a website. This is the most important aspect of web design from where the actual design starts. Your theme decides how your website will appear on the web and the functionality too. WordPress is itself a complete space for thousands of currently rolling themes for almost every niche. Companies are selling their personalized WordPress themes. You simply need to go with the right theme platform that makes your website one in a million. While searching for the right theme platform, you may come across so many options. But make sure you are choosing the platform that maintains its place in terms of functionality, ease of use, price, and more.
You need to go with a platform with certified themes and reliable customer service. Well, you don’t need to spend hours on this, as VW Themes is the best-recommended platform. Their themes are well-designed, with the latest versions giving the best qualitative features and templates. And here is the most recommended choice by VW Themes for online stores.
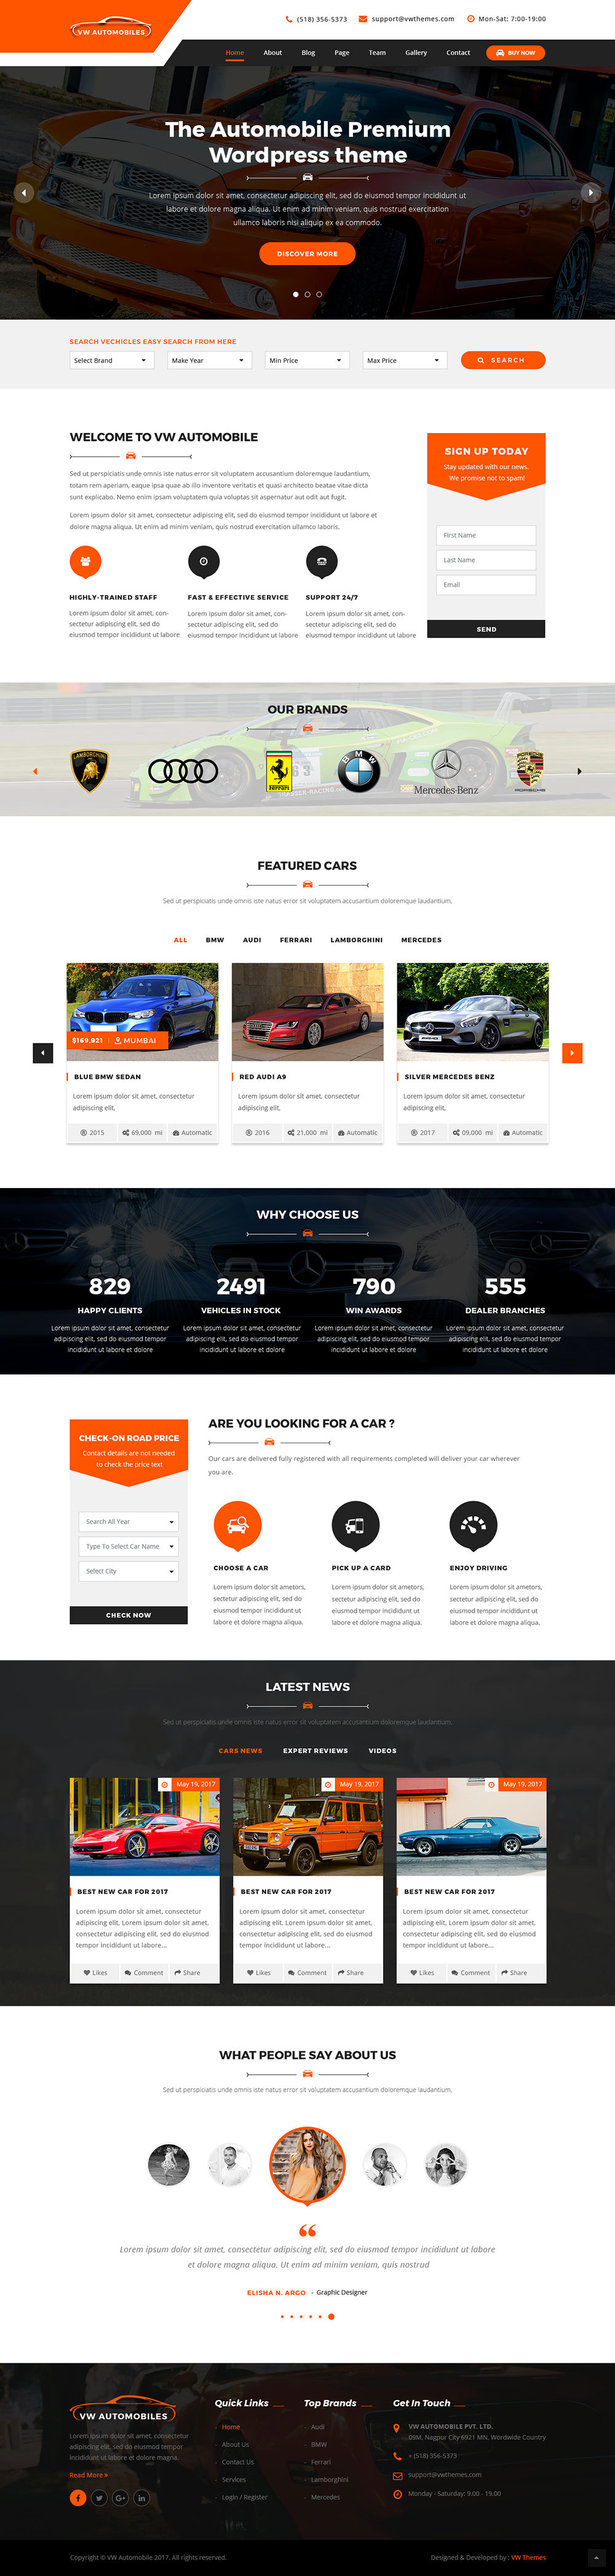
Multivendor Marketplace WordPress Theme

The premium Multivendor Marketplace WordPress theme is again one of the finest themes for online stores. The theme is to create a website for selling products that also support multivendor stores. Its multipurpose design is well-suited for almost every type of e-commerce store. The theme is well-certified, with the latest theme versions and clean designs to cater to. It comes with a well-designed and user-friendly interface with easy customization. The theme completely runs on Bootstrap, giving the best responsive website. Its unique slider features bring out smoother navigation on your site. The entire interface is pre-coded using HTML and CSS codes. So the users are completely free to add codes. It comes with the trendiest templates, blending your niche professionally. Also, there are pre-made inner pages and functional plugins to add. Woocommerce integration makes a huge move to sell products online without any hassle.
Installing WordPress theme
Now, let’s go ahead and learn about the theme installation process.
- To install a theme, simply head to the theme page and, by scrolling down, tap the Buy Now button.
- The next screen will be the checkout page, where you need to fill out vital billing and account details. After adding the details, simply make the payment and complete your purchase.
- Once the purchase is done, the zip file of the theme will be added to your device.
- Now, head to the WordPress dashboard and tap the Themes section under the Appearance tab.
- The next screen will show you the list of already installed themes, but you need to tap the Add New button for a new one.
- Once tapped, the next page will allow you to upload the zip file of the theme you want for your online store.
- Simply tap the upload file tab, select the zip file, and upload. Then tap the Install button, which will be followed by the new screen with the activate link. This will finally activate the theme on your site.
- Now, it is ready to be customized and made yours.
4. Add WooCommerce and Other Essential Plugins.
Your website has a certified theme to uplift its appearance. Now you need that element that builds up your online store. We are talking about woocommerce. Luckily, the theme you just added comes with additional plugins, and WooCommerce is one of them. So, once your theme is activated, it will take you to the homepage, where all the controls are present. You need to tap the Install Plugins section, and it will do it automatically. Woocommerce is an open-source platform built for promoting online stores. Any normal website can be turned into an online store with WooCommerce. It comes with pre-built product pages, a cart, checkout, payments, shipping, and extensions.
As Woocommerce is installed, it will take you to the setup wizard to enable all these controls on your site. On the setup wizard, you simply need to enter your business details. And under the “What to Sell” section, make sure you select both physical and digital product options. Then comes the payment section; simply enable the button in front of the payment method you need. Then comes the shipping section, where Woocommerce will set your current area, and later you can set the price according to the zone. Lastly, you can check the boxes with the additional plugins you need for your site.
If you don’t find the right plugins, then you can use the manual process to install them.
Know more about some of the best free WordPress plugins you must have for creating WordPress website in our previous blog.
Install Plugin

- To install a plugin, you must visit the Plugins section under the dashboard area.
- Then tap the Add New button for a new plugin. The next screen will be the plugin directory, where you can simply search for the plugin you need.
- Enter the plugin name, tap the Install button, and then click the Activate button.
5. Add Essential Pages.

Pages are static entities in WordPress, serving as one of the content types too. Woocommerce comes integrated with pre-built pages like shop, cart, checkout page, account, and more. But if, in case, you need more pages to set up, simply apply the manual process to add pages. To add pages in WordPress, tap the Pages section under the dashboard area. This will take you to the editor screen with various sections like the menu, sidebar, functions panel, blocks, and more.
To add feature blocks to your page, simply tap the “+” icon, and this will unlock the blocks section for you. You can simply use the drag and drop to add any feature to your page. Once done, tap the publish button to save the page.
6. Add Products.
Without products, your online store is of no use. You need two products to gear up your online store. To add products in WordPress, simply tap the Products section under Woocommerce and then tap Add New. This will take you to the new editor screen with the necessary fields to fill up. Firstly, you need to add the title and description of the product. Under this, there is the Product Data section, where you can choose the type of product. Whether it is a simple product, grouped, affiliate, or variable product,
You will find various sections to explore under the product sections, like General, Inventory, Shipping, Attributes, and more. Here, you can enter the price of your product under the general section. Similarly, you can update more fields, like inventory, for stock management and shipping. The last section is the product short description, wherein you can list out key features along with the product image. Finally, when you have added the product details, tap the Publish button to add the product. You can add more products by simply applying the same process.
7. Market your store.
Now that you have all the essential things for you to create a website for selling products, you need to market it. Marketing is one of the pivotal steps you need to take for your website to acquire traffic. Keeping a smart marketing strategy helps your website boost sales and even revenue.
The simplest way to market your site is to use social media icons or integrate your site on social platforms. Also, you can use blogging, contact forms, email marketing, or influencer marketing. Finally, you have all the assets ready, along with the marketing practices. Your online store is ready to launch on the web.
Conclusion
So, this is how to create a website for selling products online using VW themes. Building a website is never a challenging task when it comes to WordPress. This is the place where almost every small and huge business is getting their spaces well. You can be a beginner or a developer; WordPress brings out the best in your business.
For those who think web design is a daunting task, then this blog is for you. We have made it far easier to help you learn web design in simple steps. It can never be simpler when you have the right guidance. We have made a complete set of steps, including domain, hosting, theme selection, plugins, and more. You must have gone through all the steps. So, start building your online stores to sell products online without any hassle.
VW Themes empowers you to create a professional online store that stands out from the competition. Plus, by opting for the WP Theme Bundle, you gain access to a vast array of templates tailored to various industries and niches, ensuring your website's success from the start. Start your e-commerce journey today with VW Themes and unlock the full potential of your online business.