
Introduction:
In the dynamic and competitive world of online presence, creating a seamless and user-friendly website is crucial for retaining visitors and ensuring a positive user experience. One effective way to enhance navigation and user engagement is by implementing a sticky header WordPress to your website. In this blog post, we'll explore the benefits of a sticky header, discuss how to set it up in WordPress, and highlight the impact it can have on improving user experience.
What is a Sticky Header?

A sticky header, also known as a fixed or floating header, is a design element commonly used in websites. It refers to a navigation bar or header section that remains visible at the top of the page even when a user scrolls down the content. Unlike a traditional header that disappears as you scroll down, a sticky header "sticks" to the top of the viewport, ensuring that essential navigation links, the menu, and sometimes other key elements such as a logo or search bar, stay in view.
The primary purpose of a sticky header is to enhance user experience by providing continuous access to important navigation options. Users can quickly navigate to different sections of the website, access menus, or perform other essential actions without having to scroll back to the top of the page. This feature is particularly beneficial on long-scrolling pages or websites with a lot of content, as it streamlines navigation and improves overall usability.
Sticky header WordPress are widely used because they contribute to a more seamless and user-friendly browsing experience. They are often implemented through CSS (Cascading Style Sheets) or JavaScript, and many WP website themes and platforms, including WordPress, offer built-in options or plugins to enable and customize sticky headers.
Advantages of Sticky Header:
Implementing a sticky header on a website can offer several advantages, enhancing the overall user experience and contributing to improved navigation and engagement. Here are some key advantages of using a sticky header:
1. Persistent Navigation:
A sticky header ensures that key navigation elements, such as the menu and essential links, remain visible at all times. Users can easily access important parts of the website without the need to scroll back to the top, providing a more efficient and seamless navigation experience.
2. Improved User Engagement:
With a sticky header in place, users can quickly switch between pages, explore different sections, and access essential features without interruption. This streamlined navigation contributes to increased user engagement as visitors find it easier to interact with the site's content.
3. Enhanced Brand Visibility:
Keeping the logo and brand elements fixed at the top of the page ensures continuous brand visibility. This can reinforce brand recognition and leave a lasting impression on visitors, especially if the logo is strategically placed within the sticky header.
4. Optimized Mobile Experience:
Sticky headers are particularly beneficial for mobile users, where screen real estate is limited. By providing a fixed navigation bar, the mobile experience becomes more intuitive and user-friendly, leading to improved accessibility on smaller screens.
5. Reduction in Friction:
The constant visibility of the header reduces friction in the user experience. Users can easily find and interact with key elements, leading to a smoother and more enjoyable browsing journey.
6. Quick Access to Important Information:
Essential information, such as contact details, search bars, or call-to-action buttons, can be included in the sticky header, offering users immediate access without the need to navigate through the entire page.
7. Consistent User Interface:
A sticky header provides a consistent user interface across different pages of the website. Users can rely on the fixed navigation bar, creating a sense of familiarity and making it easier for them to navigate and explore content.
8. Facilitates Multitasking:
Users can multitask more effectively with a sticky header. Whether they're reading content, scrolling through images, or watching videos, having essential navigation readily available allows for a more efficient and enjoyable user experience.
9. Increased Time-on-Site:
The improved usability and accessibility offered by a sticky header can lead to increased time spent on the website. Users are more likely to explore additional pages and content when navigation is straightforward and friction is minimized.
9. Supports Website Goals:
Depending on the website's goals, a sticky header can contribute to achieving specific objectives such as increased conversions, higher engagement, and a more positive overall impression.
Implementing a Sticky Header WordPress in Website:
Now, let's walk through the process of implementing a sticky header to the site. There are three different ways to apply a sticky header. Follow these detailed steps for a seamless integration:
1. Applying a Sticky Header to WordPress site Manually:
Applying a sticky header to a WordPress site manually involves adding custom code to your theme files. Before proceeding, it's essential to create a backup of your site and be familiar with basic HTML, CSS, and WordPress theme structure. Follow these steps:
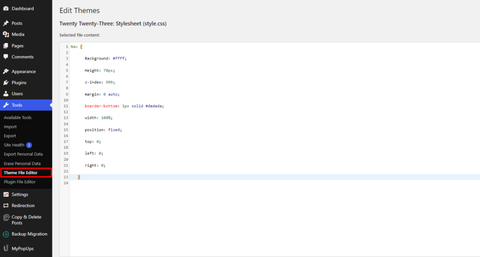
- Access Your WordPress Dashboard: Log in to your WordPress dashboard.
- Go to Theme Editor: Navigate to "Appearance" and select "Theme Editor."
- Select the Theme to Edit: On the right side, you'll see a list of theme files. Select the theme you are currently using (usually named "Theme Name" or "Active Theme").
- Locate the Header File: Look for the header file where you want to add the sticky header. Commonly, it is the header.php file. If your theme uses different file structures, check for files like header.php, header-template.php, or similar.
- Insert Custom Code: Inside the header file, locate the opening <header> tag or the tag that wraps your header content. Replace "your-header-id" with the actual ID of your header. If your header doesn't have an ID, you may need to add one to your HTML.
- Save Changes: Click the "Update File" button to save your changes.
- Check Your Site: Visit your website and scroll down to test if the sticky header is working as expected.
Note: Keep in mind that manually editing theme files has its risks. If you're not comfortable with coding or unsure about making changes, consider consulting with a developer or using a child theme to avoid potential issues with theme updates.
Always test changes in a staging environment first, and ensure you have a backup before making any modifications to your live site. If your theme supports it, using a child theme is a safer approach for customizations. Alternatively, you can use a plugin to add a sticky header without manual coding.
2. Applying a Sticky Header WordPress to Site using a Plugin:

Using a plugin is a user-friendly and non-technical way to implement a sticky header on your WordPress site. There are various plugins available, but for the purpose of this guide, we'll use the "MyStickyBar" plugin as an example. Follow these steps:
- Enter Your WordPress Dashboard Login: Enter the WordPress admin area and log in.
- Navigate to Plugins: In the WordPress dashboard, go to "Plugins" and click on "Add New."
- Search for MyStickyBar: In the search bar, type "MyStickyBar" and press Enter.
- Install and Activate: Find the "MyStickyBar" plugin in the search results, click "Install Now," and then click "Activate" once the installation is complete.
-
Configure the Plugin: After activation, go to "Settings" and select "MyStickyBar." Here, you can configure the sticky menu settings.
- Sticky Menu Options: Configure the options such as background color, opacity, and other styling settings for your sticky header.
- Desktop & Mobile Settings: Adjust the settings for both desktop and mobile views.
- Advanced Settings: Explore advanced settings such as adding a logo, custom CSS, and other fine-tuning options.
- Preview: Utilize the preview feature to see how your sticky header will look.
- Save Changes: Once you're satisfied with your settings, click the "Save Changes" button.
- Test Your Site: Visit your website and scroll down to ensure that the sticky header WordPress is working correctly.
Remember that the plugin mentioned is just one option, and there are several other sticky menu plugins available in the WordPress plugin repository. Always choose a reputable plugin, check the reviews, and ensure it is compatible with your WordPress version.
Using a plugin is a convenient solution, especially for users who are not comfortable with manual coding or editing theme files. However, keep in mind that plugins may impact site performance, and it's essential to regularly update them to ensure compatibility with the latest WordPress version.
3. Applying a Sticky Header to a WordPress Site using a WordPress Theme:
Let's explore how to apply a sticky header in WordPress using themes. However, all the themes by VW Themes offers sticky header feature. Whether it is a premium theme or free WordPress theme+, it consist of sticky header for easy navigation.
1. Landing Page Theme by VW Themes:
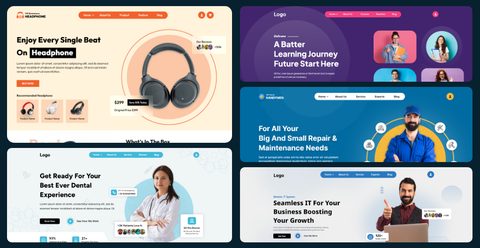
The Landing Page theme by VW Themes offers a modern and sleek design suitable for showcasing products, services, or any information effectively. The sticky header feature in this theme ensures that your site's visitors have easy access to navigation options and crucial information as they scroll through the landing page. The sticky header, with its fixed positioning, enhances user navigation, providing a seamless and engaging experience for potential customers or clients.
2. Clothing Store Theme by VW Themes:

For the Clothing Store theme, VW Themes integrates a sticky header to optimize the online shopping experience. As visitors explore various clothing items and categories, the sticky header WordPress remains fixed at the top, offering quick access to the shopping cart, search bar, and navigation menu. This feature streamlines the shopping process, making it more convenient for customers to browse, select, and purchase items without interruption.
3. Home Renovation Theme by VW Themes:

The Home Renovation theme is tailored for businesses and professionals in the home improvement industry. With a sticky header in place, this theme ensures that users can effortlessly navigate through different sections, from services offered to project portfolios. The fixed header guarantees that essential contact information and menu options remain visible, facilitating a smooth user experience for potential clients seeking renovation services.
4. LMS Education Theme by VW Themes:

VW Themes has integrated a sticky header into the LMS Education theme to enhance the learning experience for students and educators. As users explore course offerings, lessons, and educational resources, the sticky header remains anchored, providing easy access to the course menu, search functionality, and user account options. This design choice simplifies navigation, allowing users to focus on their learning journey without interruptions.
5. Influencer Agency Theme by VW Themes:

The Influencer Agency theme is designed for individuals and agencies in the influencer marketing industry. With a sticky header WordPress, VW Themes ensures that the key elements, such as the agency's logo, navigation links, and contact details, stay visible as users explore the site. This feature contributes to brand consistency and recognition, offering a professional and user-friendly experience for potential clients and collaborators.
Activation of Sticky Header:
- In each of these themes, the sticky header is typically activated by default. However, you can customize its appearance and behaviour through the theme customization options.
- Access the WordPress dashboard, go to "Appearance," and select "Customize."
- Look for "Header" or a similar section, and you may find options to customize the sticky header's colours, transparency, and additional settings.
By choosing one of these VW Themes, you leverage a pre-built solution that incorporates a sticky header, enhancing the overall user experience on your WordPress site.
Conclusion:
In conclusion, the implementation and optimization of a sticky header WordPress to the site are crucial steps toward creating an immersive and user-friendly online environment. By embracing this design trend, you not only enhance navigation and engagement but also contribute to brand visibility and recognition. Follow the comprehensive steps outlined in this guide to seamlessly integrate a sticky header and leverage advanced optimization techniques. Elevate your WordPress site to new heights, providing users with an exceptional and enjoyable browsing experience.
If you are using a WordPress Theme to apply a sticky header, then VW Themes is your destination. VW Themes offer variety of theme for all niches with best sticky header designs. Our WordPress Theme Bundle Consists of 240+ themes with advance features and best header designs. So Visit VW Themes now!
Blogs Categories
Podcast WordPress Theme (Audio Podcast 2.0)

Latest WordPress Themes


Buy All our Premium Themes just at $119
