Just as getting the best WordPress theme for your website is essential, finding the best hosting provider is also important. When you are looking forward to building a website, you need a host that offers you services of the highest quality.
Migrating WordPress website with hundreds or thousands of pages is a complex and risky procedure for any company. It’s cause for even more concern when the website relies on search engines to drive the bulk of its traffic to your website.
We have all heard of horror stories related to website migrations going bad and wiping out a company’s search engine rankings overnight. But you do not have to worry because moving your website is not as complicated as it looks.
It can be time-consuming; however, the task is much simpler. If you have found the best hosting that offers the best features, maybe moving is not a bad idea eventually.
To facilitate the seamless WordPress host transfer and make things much easier for you, this guide has been created for you. You can follow the step to enjoy your new hosting provider’s services.
Reasons For WordPress Website Migration
WordPress migration takes place when you move or transfer your WordPress site from your current to a new server. This shift ensures that your website functions the same. There are many reasons for migration. These include:
1. One of the significant reasons for making this move is growth. As your website expands, it will require more resources and servers for this development.
2. Your current host is not as good as other options. Some hosts deliver a superior infrastructure as compared to your current host. They also come with responsive customer support. Further, some may also offer competitive pricing.
3. Has your website’s security been compromised? If yes, then you have a good reason to make the switch. Usually, if your website suffers an attack, your provider must be able to handle the situation correctly or have better security features.
4. Changing your web host can help when you want to change your domain. Moving your site will help you with rebranding.
5. If you are planning to change your website’s design, you can move it to a live server from a development server.
6. Another reason for migrating your website is when you are shifting to a TLD or top-level domain from a subdirectory.
7. You can migrate to a new hosting when you are looking forward to expanding or localizing your country-specific site.
8. If you want your website version for mobile to merge with the version for desktop, you can use web hosting. You can make the desktop version responsive and switch the address to the website version for all devices.
Options For Migrating WordPress Website to New Host or Server
There are several options available to migrate your WordPress website to new hosting, selecting the right one totally depends on your convenience.
First, migrating automatically using plugins and tools for migration. There are multiple plugin options available for migrating your WordPress website.
Second option is asking your host provider to migrate your WordPress website. But this solely depends on the hosting provider you choose. Many WordPress hosting providers have included migration of WordPress as the free feature to their clients.
Another old school option is to migrate manually using SFTP/FTP, you will have to use FTP or file transfer protocol, modify files and access databases.
When you use plugins for migration, there is a possibility of errors. Therefore, the large website can make better use of transferring their website manually. The manual option may seem complicated, but as you will learn, it is much easier.
Manually Transfer Website to New Hosting
To transfer your website manually, follow the given steps:
Step 1: Who Is Your New Host?
If you are not satisfied with the current services you are using, you may want to make the switch. To do this, you must first look for a new host. A provider that checks all the boxes for what you need will be the ideal option.
It is essential to ensure that your new host will provide you with the features your current host lacks. Additionally, keep the issues you have faced earlier while making a decision. Say, there was a security issue with your previous provider. Thus, you must look for better security features.
Further, there are different types of hosts available. shared hosting providers are available if you are looking for a budget-friendly alternative. They house multiple websites under one server, sharing the same resources. You can choose VPS or a virtual private server if you need dedicated resources for your website.
Additionally, a VPS features a single server with multiple virtual partitions. You can choose dedicated hosting if you want a server that only houses your website. Some providers offer services for handling technically demanding tasks, including updating and backing up. Such type of hosting plan will fall under managed hosting plan.
Make sure to choose a host that fulfils all your needs. Therefore, before selecting the provider, list your priorities. These could be better loading speed, high security, more storage, customer support, and more.
Step 2: Backing Up the Website’s Files
The greatest fear for website owners when moving to a new host is the possibility of losing their data. Therefore, once you have found yourself a new host, it is time to save all the files from your website. You can make use of the FTP tool to carry out this process. Free options, such as FileZilla, FireFTP, Cyberduck, etc., are available for you to use.
Start by connecting your website’s server with your FTP. Next, go to the root folder. It holds all your website’s files. The folder is known either by “public_html”, your website’s name or “www”.
You can download the root folder by right-clicking and selecting the “Download” option. After saving the complete “root” directory on your computer, you can move to the next step.
Step 3: Backing up WordPress Database
After completing the process of backing up the website’s files, it is time to create a database backup. The database is an essential part of your website. It includes the data related to the content of your website, its users and more.
To back up the database, you need to access the database. To do this, you can use the control panel which most web hosts provide. Next, select “phpMyAdmin” on your current hosting. This option is present in the “Databases” section.
Step 4: Export Database
Once you can access phpMyAdmin, you can start exporting your database. If the list has multiple databases, ensure to confirm with your provider. Once you have selected your website’s database, you can start downloading.
To do this, use the menu on top to go to the “Export” tab. Here, you will find the “Export Method” option. Next, click the “Quick” export type to get a copy in the “.sql” format.
Step 5: Create New Database for Import
You have your backup. It is now time to move the generated file to your new host. Therefore, you should visit your new host and create a database first. Following this, you can import the old database files. Doing so, the old content will override the new web host’s content.
Follow the given steps if your new host features a cPanel:
In cPanel, you will find the section named “Databases”. Here, you will find the option “MySQL Databases”.
The next step is to create a database. Give your database a name and select the “Create Database” option. The username adds to this name as its prefix automatically.
Each database requires a user. You can create a new user using the “MySQL Users” section. Enter the details under the “Password” and “Username”. Make sure to note down these details to use later on.
Now, access the newly generated database with the help of “phpMyAdmin”.
Here, navigate to “Import” and choose the previously generated “.sql” file.
Step 6: Upload Website’s File
Your job is only half done. The process of uploading your files to your new host is still left. To do this, you will require an FTP. Once you have found the right FTP, use it to log into the new web server. Following this, visit the “root” folder.
Upon right-clicking within this folder, you will get the option to “upload”. Next, look for the folder you saved in step two. Upon opening this folder, you can find and select all files and other essential documents to upload.
Step 7: Editing “wp-config.php” File
You have completed the backup and successfully uploaded all your files. However, if you now try to visit your website, it will not work. Therefore, the next step involved editing the wp-config.php file. The function of this file is to connect your WordPress website to its database.
The wp-config.php file still consists of the information related to your old host. Thus, you must update it with the new information. To do this, you will require the details you noted while creating the new database and new user, i.e., the name, username, password and host.
Next, access the new WordPress “root” folder. Here, you will find the wp-config.php file. Upon right-clicking this file, you will get the option to “View/Edit”. Upon selecting this option, your file will open with a text editor. You have the liberty to edit this file.
To update the information, you will be making changes to the following lines:
‘define (‘DB_NAME, ‘db_name’)‘: The “db_name” has the name of your old database. You will have to change it to the new database name.
‘define (‘DB_USER, ‘db_user’)’: The “db_user” will consist of the username of your previous hosting, change it to the new username.
‘define (‘DB_PASSWORD, ‘db_pass’)’: Next, make changes to “db_pass”. Update it with the password for the new user.
Step 8: Update the Domain Name System Settings
You have successfully migrated your website to its new host. Now all you need to do is connect the domain name to the new website. When you switch from one host to another, the domain name system, also known as DNS, still points to your old server. Therefore, you must make a change to your DNS settings.
Based on where your domain is registered, the process will vary. Therefore, you will need to ask your new hosting provider for the details first. Next, go to where you have your domain name registered. The domain register will have all the information you need to make changes.
Remember, it will take around two days to completely propagate the changes you make. Therefore, you can make these changes when there is less traffic. During this period, do not make any changes to your website.
After this process, remove the database and files in your previous web host. However, make sure you have backed up everything.
Migrate WordPress Site Using WordPress Migration Plugin
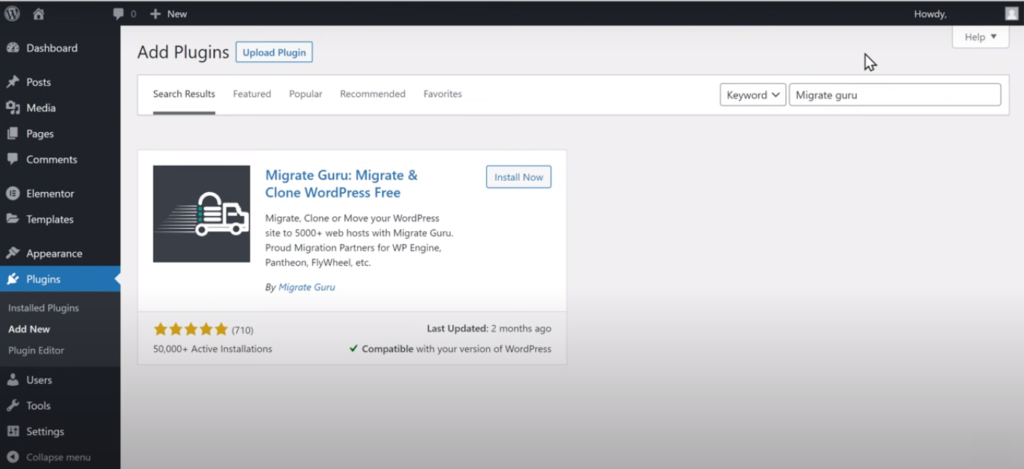
Other than the manual option, you can also employ migration plugins. “Migrate guru” is one of the best WordPress migration plugins. Here is step by step process to migrate your WordPress website to new host.
Step 1. The first step is installing your migration plugin on your WordPress
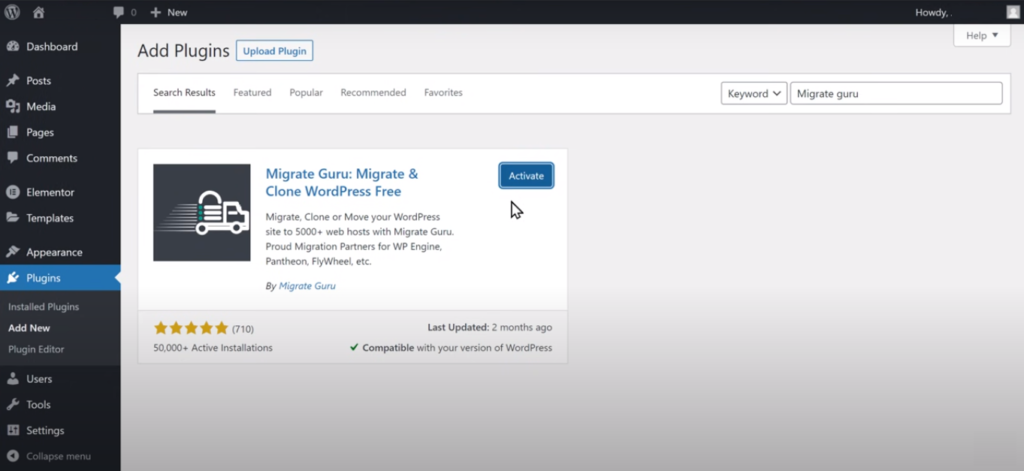
Step 2. After you successfully installed plugin, click on “Activate” Button
Step 3. Once plugin is activated>>Go to Left Sidebar and click “Migrate Guru” Plugin option
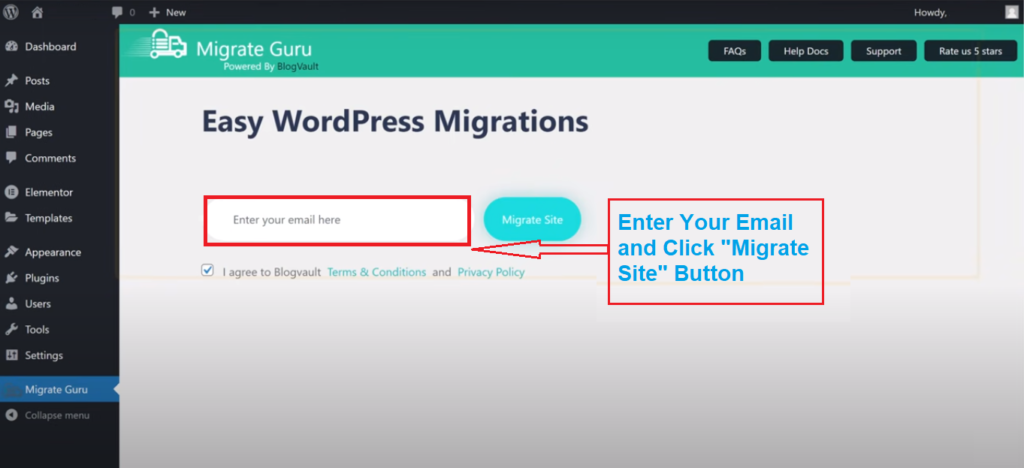
Step 4. Enter you email address, and click on “Migrate Site” button. After clicking on “Migrate Site” button you will be navigated to select the host option that you have choose.
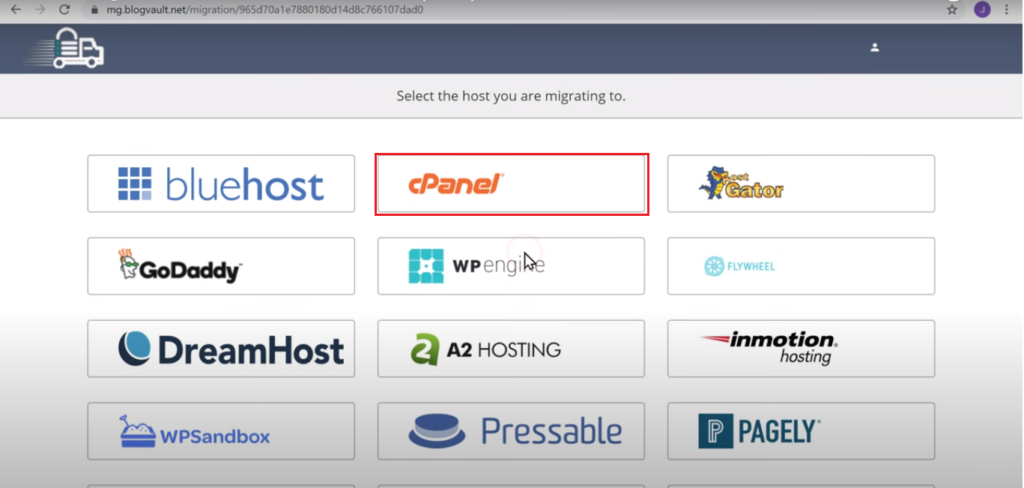
Step 5. Click on the Hosting name you have purchased to proceed further.
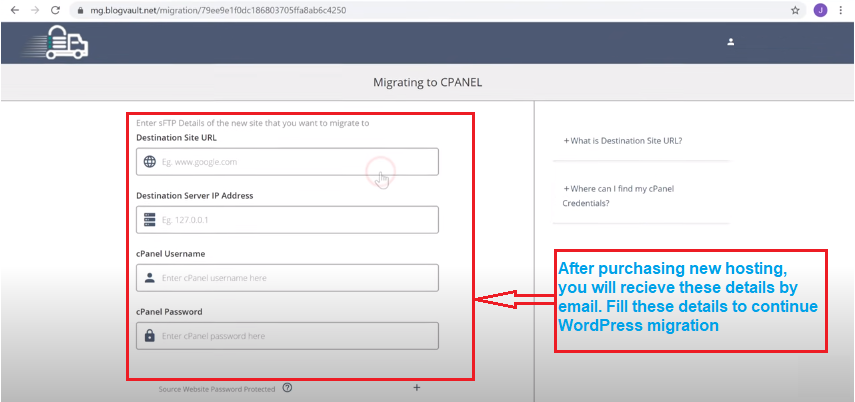
Step 6. Once you have selected your new host, it will ask you to enter details like destination site URL, Server IP Address, cPanel Username, and Password. Enter all these details correctly that you have received from your new hosting provider through email.
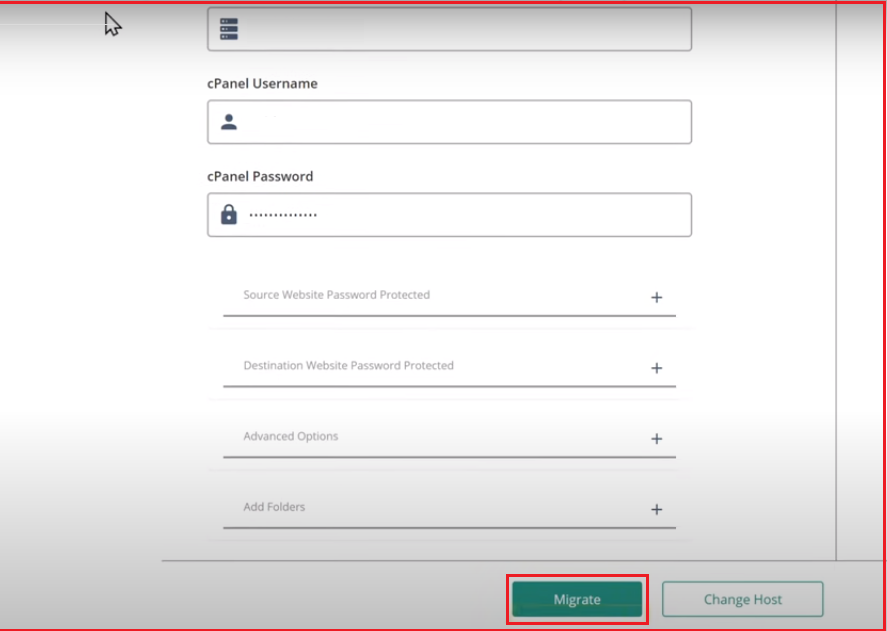
Step 7. After entering complete details click on “Migrate” button
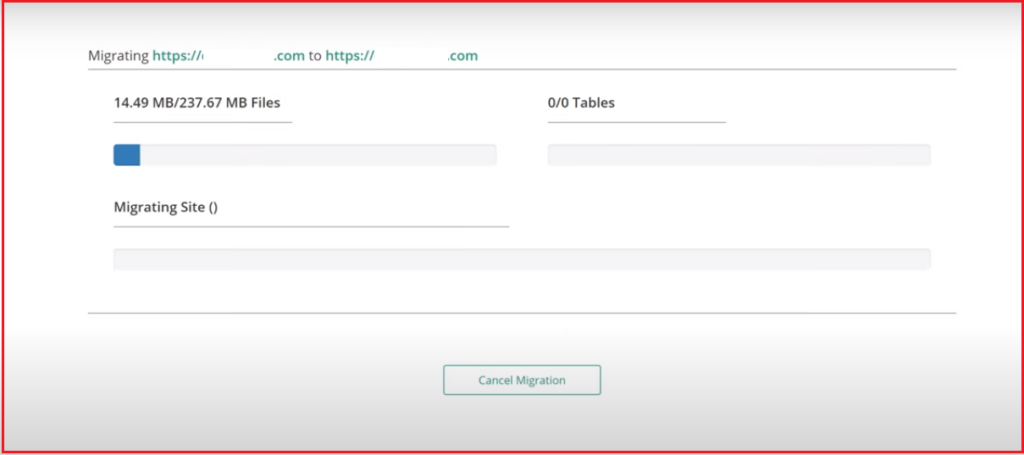
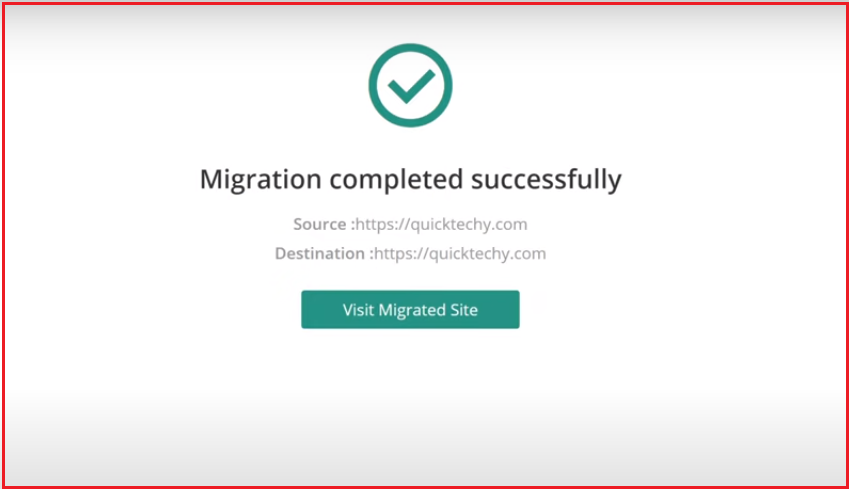
Step 8. After clicking “Migrate” button, your website data will start migrating to new hosting provider. Once all files of your WordPress site will transfer to new host, you WordPress migration will complete and you will receive process completion message as shown in following image.
Migrate WordPress Site Using Web Hosting Migration Service
If you want an option that is not as stressful as the above alternatives, you should ask your new hosting provider. Often web hosting providers offers free website migration services, if not, you can always enquire with them.
Hosting providers offers one-click migration tool that automatically transfer your WordPress website from old host to new one. Even if you find it difficult, their technical team can assist you in the process to troubleshoot issues.
Conclusion
If you have a website that you want to grow, but your current host lacks services and support, you can consider making the switch. Several hosting providers are available to fulfil your requirements.
However, migrating your website can seem like a daunting task. The reason is the possibility of losing your data or suffering downtime. But choosing the right option can make this task much simple, if not stress-free.
You can choose to migrate host of your WordPress website using plugins, cPanel or manually. Ideally, you can use plugins to make the process easier. However, there are chances of errors during the migration process for larger websites. Thus, you can make use of the manual process.
If your web host makes the feature cPanel, you can use cPanel for migrating. Moreover, providers also offer services for migration. You can, therefore, ask for your new host’s assistance for easier migration.
FAQs on WordPress Site Migration to New Host or Server
How to check if the website is loading from new hosting?
There are many ways to confirm if your WordPress website have moved and loading from new host provider.
You can check for Ip address, if it changed it is likely that the WordPress website has been migrated to new host.
You can make the use of free tool like DNS lookup to check the DNS record of the website, if the record has been updated, it is sign that your website has been moved to new hosting provider.
Other signs those indicates the migration of your WordPress site to new host are checking website loading speed, check content and look of the website.
Or you can just visit websitelearners.com and put your domain name and check where your website is hosted.
Is it safe to use migration plugins to migrate WordPress site to new host?
Migration plugins for WordPress website migration are considered to be safe as long as they are used properly. Before using a migration plugin, it is important to back up your current website and test the migration process on a staging site.
Also, it is recommended to choose a reputable and well-reviewed plugin, and to follow the instructions carefully to avoid any potential issues.
How long does it take to migrate WordPress website to new host?
WordPress migration do not have the exact time and it can vary depending on several factors such as the size and complexity of the website, technical skill level of migrator, and the internet speed.
On average, it can take anywhere from 2-6 hours to migrate a WordPress website to a new host. It can be quicker if the website is small and the technical knowledge is higher, but it can take longer if the website is large, and complex, or if the technical knowledge is low.


