In WordPress 5.0, the classic content editor was changed with a brand new block editor, known as Gutenberg. Since then, many of our readers have asked us to make a comprehensive tutorial on how to make use of the Gutenberg block editor in WordPress. The Gutenberg plugin is relevant, no doubt. WordPress block editor is a new and different way of making content in WordPress. In this tutorial, we show you how to use the latest WordPress block editor and master it to make visually stunning blog posts as well as pages. You can install Gutenberg plugin.
Difference Between Block Editor (Gutenberg) and Classic Editor?
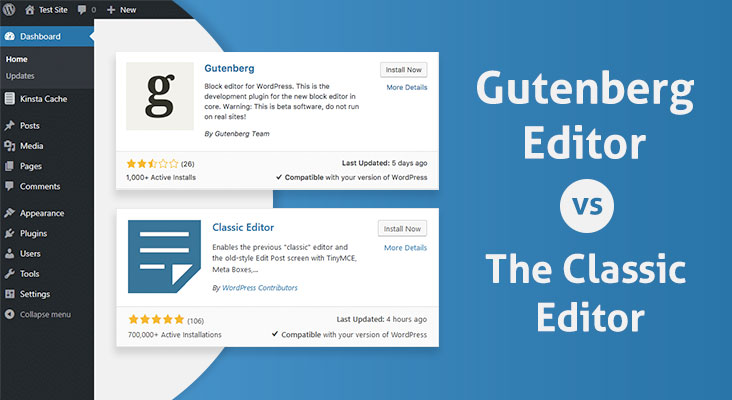
Before we go into the new editor, first compare and understand the differences between Gutenberg Block Editor as well as the Classic Editor.
Here is what the classic editor in WordPress looked like:
- As you can see, they are completely different editors for creating content in WordPress.
- The old classic editor is a text editor with formatting buttons similar to Microsoft Word.
- The new editor makes use of a different approach, called ‘Blocks’ (therefore, the name Block Editor).
- Blocks are content elements adding to the edit screen to make content layouts. Each item you add to a post or page is a block.
- You can add blocks for each paragraph, images, videos, galleries, audio, lists, and more. There are blocks for common content elements and much more can be added by WordPress plugins. The Gutenberg WordPress plugin is reliable.
- How is the current WordPress block editor better compared to classic editors?
The new WordPress block editor provides a simple way to add different types of content to the posts and pages.
For example, earlier if you wanted to add a table in the content, then you needed another table plugin.
- With the new editor, you simply add a table block, choose your columns and rows, and commence adding content.
- You can shift content elements up and down, edit them as individual blocks, and create media-rich content.
- More than that, the new WordPress block editor is hasslefree to use and learn.
- This gives a high advantage to all WordPress beginners who are just starting their first blog or making a DIY business website.
Take a look at how to make use of new WordPress block editor like a pro to make great content. Here is what we cover in this Gutenberg tutorial:
- Using Gutenberg – The new WordPress block editor
- Making a new blog post or page
- Process to add a block in Gutenberg
- Work with blocks in the new editor
- Save and reuse blocks in Gutenberg
- Publish and post settings in Gutenberg
- Plugin settings in new editor
- Add some common blocks in Gutenberg
- Explore some new content blocks in Gutenberg
- Bonus tips on using Gutenberg like a pro
- Add more blocks to Gutenberg Block Editor
- FAQs about Gutenber.
Using the Gutenberg – The New WordPress Block Editor
The block editor is crafted to be intuitive as well as flexible. While it looks separate from the old WordPress editor, it still does the things that you were able to get done in the classic editor.
Let’s start with the basic things that you did in the classic editor, and how these are done in the block editor. WordPress install Gutenberg plugin is a preferred choice.
Making a New Blog Post or Page with The Block Editor
You will create a new blog post or page like you normally would. Simply click on Posts » Add New menu in the WordPress admin. If you make a page, then go to Pages » Add New menu.
Save And Use Again Blocks In Gutenberg
- One of the best things about blocks is that they are saved as well as reused individually. This is beneficial for bloggers who require to add specific content snippets to their articles.
- Simply click on the menu button at the right corner of the block’s toolbar. From the menu, choose the ‘Add to reusable blocks’ option.
- The block editor will save the block as a reusable block.
- Now that you saved a block, let’s see how to add reusable blocks into other WordPress posts as well as pages on your site.
- Simply edit the post or page where you are interested to add the reusable block. From the post edit screen, click on the adblock button.
- You will find the saved block under the ‘Reusable’ tab. You also find it by typing name in the search bar.
Publish And Managing Options in Gutenberg Block Editor
Each WordPress post has a lot of metadata. This carries information like publish date, categories and tags, featured images and more.
All these options are placed in the right column on the editor screen.
Add Some Common Blocks in New Editor
Basically, the new editor does everything the classic editor did. However, you will do things faster than before.
- Add an image in new WordPress editor.
- There is an image block in the new WordPress editor. Add the block and upload an image file or choose from the media library.
- Add a link in new block Editor.
- The block editor has several blocks where you add text. Most commonly used is the paragraph block coming with an insert link button in the toolbar. All text blocks include a link button in the toolbar. No doubt, WordPress install Gutenberg plugin is a tested one and beneficial.
Try our latest WordPress themes today and get amazing discounts. Our creative WP themes will help you create outstanding websites for your business, blog, or services.


