Introduction
E-learning has been the most booming system in the past few years and is still getting enhanced day by day. The reason is that students are being encouraged more towards online learning than offline education.
This has raised the urge to create e-learning websites for schools, colleges, and universities. If your education firm hasn’t enrolled in an e-learning system, then this is the right time. And not to worry, as we have come up with the best places and ways to create an e learning website in this blog. We have made a set of steps that will guide the website creation process. So, let’s get initiated.
What is an e-learning website?
An e-learning website is a platform to encourage online learning through design and development. Bringing education to the web is the smartest way to contribute to e-learning. Here, you bring the educational assets onto a platform where they can study, learn, and enjoy themselves as well. Not only this, it becomes a great medium to access study materials, clear concepts, and even interact with tutors. Also, teachers and education systems can create an interactive learning environment for them. It can be in the form of quizzes, online courses, or video tutorials.
On top of that, building an e-learning website has made the education system stronger than ever. The creativity of students and their ability to learn and adapt to new things has reached a greater height. They can easily download course books and watch videos anytime and anywhere. Also, websites support responsive design so that students can easily access them on any device.
Steps to Create an E Learning Website with WordPress
Creating an e-learning website requires following a set of steps:
1. Get a certified hosting and domain service.
A website cannot run effectively until it is registered with certified hosting and a domain. These are the two most vital assets of creating a website.
a) Domain Name
A domain is the address of your website. This is the name with which end users will be able to identify your brand on the web. The domain mainly ends with “.com,” “.co,” or “.in.” Without a domain, your website cannot hold an identity on the web.
The domain address can have your brand name or any other you can pick. You can easily register for your site’s domain from popular domain providers. You can choose from NameCheap, GoDaddy, Bluehost, and more. Make sure your domain is simple and easy to understand and pronounce. It must be short and precise.
b) Hosting Service
While the hosting service is the home of your website, Just like the domain is the address, hosting is a complete place for your site. All the vital data files are stored on the server. It provides a professional server on which your website will run on the web. While going for a certified hosting service, you must look for uptime, a reliable server, great support, and a good price. Also, the hosting must be well-versed in WordPress and well-optimized with the themes and plugins.
Just like the domain, you will come across several popular hosting services like Bluehost, Godaddy, HostGator, and more. According to your needs and budget, you must choose one that makes your website shine. Once you have chosen the right hosting service, you must move ahead with the WordPress installation.
2. Install WordPress
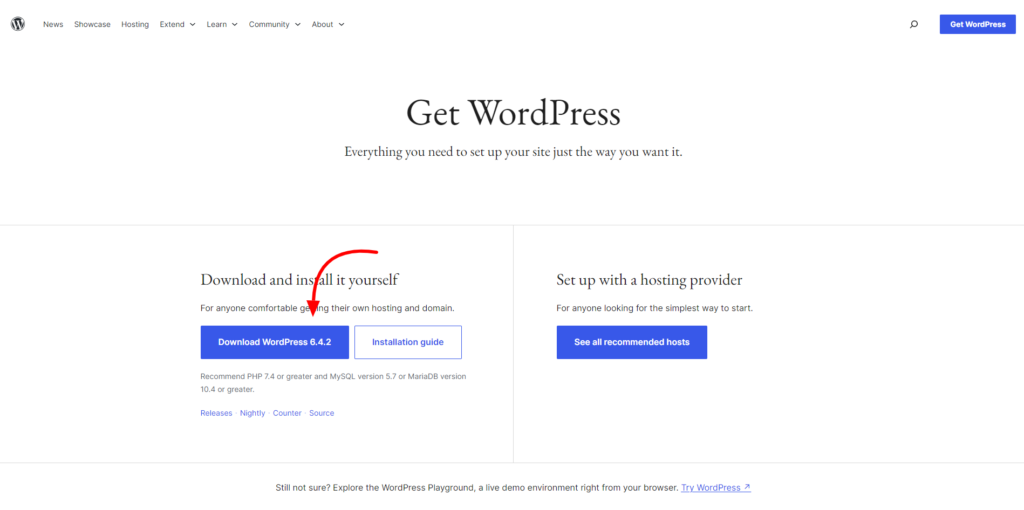
When you have chosen the right and certified hosting service, it’s time to get WordPress installed. WordPress installation is made far simpler with just a few clicks. This is a simplified process right from the control panel of your hosting service. You simply need to enter login credentials, and here you are with a blank WordPress site.
With some highly popular hosting services like Bluehost, it’s just a game of a single click, and WordPress is installed for you.
So now, I hope you are going with the flow and installing WordPress successfully for your website. It’s now time to get through the actual process of creating an e-learning website. The next step is to choose the best theme for the e-learning website. You can read our previous blog after installing WordPress to get a detailed knowledge of the steps to do after WordPress is installed.
3. Choose the best theme to create an e learning website.
You have successfully crossed the initial stage of creating an e-learning website. You chose the best hosting service, got the right domain, and installed WordPress. It’s time to proceed further to choose the right theme for your e-learning site.
Choosing the right theme for WordPress is one of the most daunting tasks you can face. There are so many themes to choose from for your e-learning website. Ideally, you must go with a premium WordPress theme that resembles your e-learning website. It should possess the ability to create online courses, quizzes, and perfect learning assets.
Out of so many platforms selling top-tier e-learning themes, we highly recommend going with the VW themes. And let me tell you that this platform has a perfect theme, the LMS Education WordPress theme.
LMS Education WordPress Theme
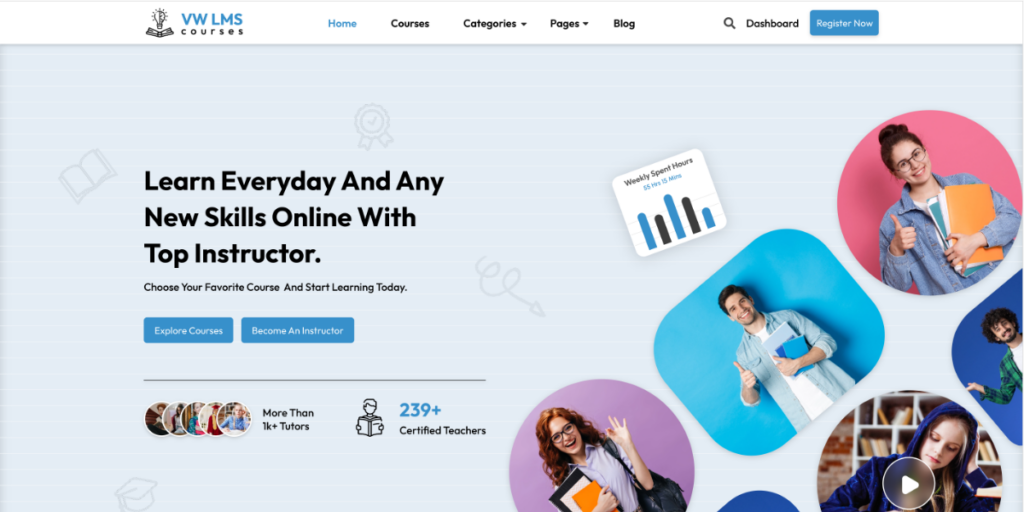
The premium LMS Education WordPress theme is designed with education standards in mind. The theme is sophisticated, professional, and modern, perfect for e-learning websites. This is just a banger to encourage modern education through innovative features and designs. It is well-structured with the finest and most modern web design assets. Its responsive design and cross-browser compatibility make it a wonderful choice for students. It is designed with the most creative education templates, promoting online courses and quizzes. Plus, there is integration with WordPress plugins like WooCommerce, Translator, and contact forms. These plugins encourage enhanced functionality on your site. The theme is further layered with SEO optimization to get your website to the top of the SERP ranks. Social media icons make it a wonderful choice to have an e-learning website.
Theme Installation
Once you have chosen the right theme, it’s time to proceed with the installation process. To install this LMS Education WordPress theme, you need to follow this step-by-step guide:
- Visit the VW Themes page, and under the themes section, search for the LMS Education theme.
- Once found, tap it, and you will reach the LMS Education theme page. Scroll a little on the theme page and again tap the Buy Now button.
- This will install the zip file for the LMS Education theme.
- Next, reach your WordPress website dashboard and tap the Appearance tab.
- Under various options from the appearance tab, select the themes section, and you will reach the theme page.
- Simply press the Add New button, and it will help you reach the theme directory.
- Above the themes directory section, tap the Upload Theme button.
- The next page will ask you to upload the zip file to your device. Once uploaded, the Install button will be activated beside it.
- Tap the Install button, and the next page will show you that the theme is installed. Lastly, activate the theme on your site.
- Now that you have installed the theme, it’s time to take a tour of it and install vital plugins.
Plugin Installation
- You have installed and activated the LMS Education theme; immediately, it will open the theme homepage. It will guide you to explore the theme, but first, you need to enter the license key.
- Next, you will see the plugins page, where all the integrated plugins with the theme will be present.
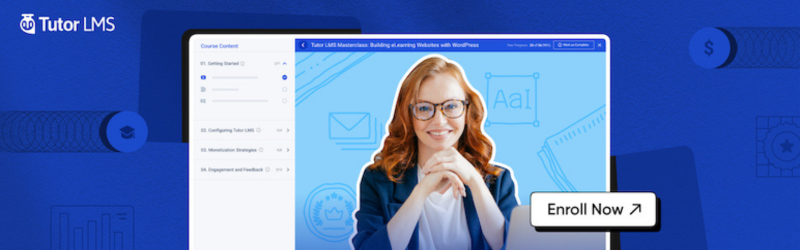
- Simply tap Install Plugins at the bottom of the page. Plugins like Woocommerce, Translate WordPress, Contact Form 7, and more will be installed. This way, all the plugins will be installed. But let me tell you that you need the most vital WordPress LMS plugins, the Tutor LMS plugin, to create an e learning website.
- Unfortunately, this plugin is not installed with the theme. You need to manually install it.
- For this, simply visit the WordPress dashboard and tap the Plugins section. The plugins page will be opened with already-installed plugins. To add a new plugin, simply tap the Add New button in the top area.
- You will reach the plugins directory and search for the Tutor LMS plugin in it. Once found, tap the install button, and then activate it.
- Now that we have all the necessary plugins and the right theme installed, let us move ahead.
4. Create online courses using the Tutor LMS plugin.
- After installing the Tutor LMS Plugin on your site, you must now configure its settings. For this, simply visit the plugins page, and under the Tutor LMS plugin, tap the Settings link.
- The settings page will have five different settings to configure. It includes general, course, monetization, design, and advanced settings.
- You can simply tap the setting and customize it as per your requirements. Once done, you are now ready to create your site. To create quizzes and explore more e-learning assets, you can upgrade to the pro version of the plugin.
- Since we are using the basic and free versions, it will be a simplified course development process.
- On the dashboard area and under the Tutor LMS section, tap the Course option.
- You will reach the course page and simply tap the Add New button.
- The next page will ask you to add a title, description, and more details about the course. You can even set the difficulty level and customize more options for it.
- Once done, tap the publish button, and your course will be uploaded. This way, you can create more courses easily.
- You can even sell courses online by integrating WooCommerce with it. It comes with various online payment gateways like Stripe, PayPal, and more.
5. Preview and launch your e-learning website.
Now that you have encountered every part of the e-learning website, it’s time to preview your site.
This step just lies before launching your website live on the web. This is where you can make additional and on-time changes to your site.
You must check whether the web pages are working faster or not. Ensure that your site works best on every screen size. Test your created courses and make sure they all work perfectly. When you are sure that your site is responding well, you are ready to launch it.
Conclusion
In conclusion, create an e learning website using an LMS WordPress theme offers an incredible opportunity to craft a robust and engaging educational website. Throughout this guide, we’ve explored the step-by-step process, from selecting the right LMS WordPress theme to customization and content creation.
By leveraging the features inherent in LMS themes, such as course management, user-friendly interfaces, multimedia integration, and assessment tools, you can create an immersive learning environment. These themes empower educators, trainers, and institutions to deliver content effectively, engage learners, and track their progress seamlessly.
Additionally, the flexibility of WordPress, coupled with the diverse array of plugins and extensions available, allows for further customization and enhancement of the e-learning experience. Whether it’s adding forums for discussions, implementing gamification elements, or integrating e-commerce for course sales, the adaptability of LMS WordPress themes caters to various educational needs.
Visit WordPress Theme Bundle by VW Themes that comprises with theme collection that caters educational needs and are versatile. Either it is about designs, layouts or functionalities, our theme collection excels in all aspects.
In essence, embarking on the journey of building an e-learning platform with an LMS WordPress theme holds immense potential. It not only facilitates the dissemination of knowledge but also cultivates a conducive online environment for learning, contributing to the evolution of education in the digital era.


