
Introduction
Having a clothing store is not enough to get easily recognized by more users. It needs to have a digital touch with a website design.
A clothing website can set milestones for your clothing brand. If you are seeking such an appraisal for your business, then why don’t you create a website for it?
Well, I know it seems crucial to design a website without having any coding skills. But let me tell you that we are here to make this process simpler. Want to know?
Follow this blog, as we have made a complete tutorial on how to create a clothing website. Let’s get initiated.
Steps to create a mesmerizing Clothing Store Website in WordPress
A Clothing Store website is a virtual destination representing fashion and clothing apparel. This is the place where clothing store owners can generate personal revenue as well as a brand identity. WordPress makes it much easier to create a clothing store effortlessly, without much hesitation. You simply need to go through some steps for this:
1. Choose Domain
A clothing website needs to have a strong domain so that end users can easily find you on the web. A domain is the addressing element or identity of any website. It is the most vital and first step to finalizing any niche website.
The domain name mostly contains your brand or company name and ends with ".com," ".co," and ".in." Since this is the addressing element, it needs to be easily remembered. Note that complex domains are often forgotten easily.
Domains with simple and precise pronunciations are easily remembered. It should contain special characters, uppercase letters, or numbers.
The domain can be found on domain registrars easily. You can simply go for GoDaddy, NameCheap, Bluehost, and more.
2. Purchase a Certified Hosting Provider
After getting registered with a domain, the next step is to purchase a hosting provider. Hosting and Domain name are two different tasks. A hosting provider is a medium through which your website files are uploaded to the web. This works like a home for your website, where you can easily safeguard all the website files. Without hosting, your website cannot run properly on the web. However, there are so many hosting providers on the internet. You need to stick to one that provides reliable services for your website.
A certified hosting service must have uptime services, better speed and support, and good pricing plans. A good hosting service can help your site boost performance and sales. You can choose among the best providers like Bluehost, GoDaddy, HostGator, and more. Some professional hosting providers, like Bluehost, even come with a free domain name for a whole year.
So, you must get the best hosting provider so that your website will get immense benefit from it.
For this tutorial, we are taking the example of purchasing the hosting service from GoDaddy.
Steps to Purchase GoDaddy Hosting Provider:
- Reach the GoDaddy website, and among various menus like Domains, Website, and Hosting, choose Hosting to create a clothing website.
- A drop-down list will appear, and you need to tap the Web hosting option.
- Once selected, the next page will guide you to purchase the plans of your choice. You can choose from Economy, Deluxe, Ultimate, and Maximum plans.
- Once you have chosen the plan, tap the Add to Cart button under the plan. Then click the Continue button on the next page.
- On this page, you can add extra features like an SSL certificate, essential web security, and more with additional charges.
- The next step is to choose a domain for your website. If you have already chosen your domain, then skip this step.
- If not, then you can select a unique domain for your site by simply entering your brand name.
- This way you can get your site’s free domain under the hosting plan.
- Once you have chosen the domain, click the Submit button to continue.
- The next step is to finalize the hosting plan for your clothing website.
- Choose from the available payment options and complete the checkout process.
3. Set up and install WordPress.

Once your hosting plan is done, it's time to set up and install WordPress for further proceedings.
To install and set up WordPress, you need to sign in to your GoDaddy account.
On the right-top corner of the screen, under your name, you need to tap the My Products option. On the next page, tap the All Products and Services option, and again tap the Web Hosting section.
Under this, you need to simply tap the Setup option on the black button. With this, the next page will ask you to enter the domain of your website and tap the Update button.
Next, you need to enter the data center for your hosting location, where your website will run. Next, it will ask you to choose WordPress as your application builder for your clothing store. You need to select the Yes option, and you will be asked to enter the website credentials. Enter the username and password, and then tap the Next button.
Once done, the next window will tell you that the Onboarding was completed successfully, and then tap the Go to Dashboard button.
On the dashboard area, you need to tap the Install Application button. Once tapped, you will be taken to your website with a “Hello World” message.
Again, reach the admin dashboard, but before that, you will see a login page to enter your username and password.
Simply enter the credentials and tap the Login button and you will be asked to choose a starter template. Among so many templates, you can choose or skip this, tap the Exit option. Now, you are ready to customize and create a clothing website as you desire.
4. Choose a Clothing Store WordPress Theme
Now that you have your blank WordPress website ready, it's time to take a pivotal step to allure it. To make your website live, a theme is a vital asset.
A WordPress theme is a pack full of innovative web design assets like templates, features, and plugins. Getting a theme for your website makes it look lively.
WordPress comes with a lot of free as well as premium WordPress themes that are designed for any niche you choose to have. But let me tell you that numbers and theme platforms will confuse your mind. So, among so many platforms selling themes on the web, you need to go with a professional one.
Stop thinking too much, as VW Themes makes a huge move in giving the best-designed themes for you. Themes at VW are not just great in appearance but are skilled in functionality and affordable price too. And for your Clothing Store website, they have their mesmerizing Clothing Store theme. Let us get more insights into it.
Clothing Store WordPress Theme

The premium Clothing Store theme by VW is a charismatic tool for a customized online clothing store. The theme is meticulously crafted to support online clothing sellers and retailers. It holds a complete package to which your clothing store can easily reach miles. Plus, its integration with various platforms allows you to widen your business reach. In terms of its design, the colorful textures connect powerfully with customers.
It comes with a sleek homepage filled with a sidebar and menu items. Single-click demo importers, plugins, and templates make web design easier. No matter whether you are an experienced coder or a beginner, the theme responds the same for all. Since this is a business website, WooCommerce integration and gallery plugins play a vital role. Various sections, like widgets, sliders, and product pages, can be easily added using drag and drop. The theme is further fully optimized for speed and SEO optimization and excels in support too.
I know this is the best theme you have already chosen to get for your clothing store website. You can get more such sleek and stylish collection of premium themes in our WordPress Theme Bundle. Our themes comes with best functionality, user-friendly layouts, multilingual capability, easy customization and many more.
Steps to Install Clothing Store Theme on your Website:
- Visit the VW Themes page and search for the Clothing Store theme. Once found, tap the Buy Now button under the theme description.
- Once done, you will reach the billing page to enter vital account details to complete the purchase. Simply fill in the details and complete the purchase. A zip file of the theme will be downloaded to your device.
- Quickly reach your WordPress admin dashboard and tap the Appearance tab.
- Among various options, you need to tap the Themes option.
- The next page will show you the list of themes already installed on your website. But you need to install a new theme.
- So, you need to tap the Add New button at the upper part of the page. Immediately a window with WordPress Themes library will be opened.
- Above it, tap the Upload file button and select the zip file of the theme you just downloaded. Once uploaded, tap the Install button.
- Once installed, tap the activate button.
Congratulations! The Clothing Store WordPress theme is finally yours. The next step is to customize and create a clothing website for your store with this theme.
5. Install WooCommerce and other useful plugins.
After getting the right theme for your Clothing Store website, now the time is to install Woocommerce and other necessary plugins.
But first, let me tell you that any e-commerce store is incomplete without Woocommerce. This is the plugin through which WordPress online stores are placed perfectly.
To install Woocommerce, reach the admin dashboard and tap the Plugins section.
The next page will show you a complete list of already installed plugins on your website. But you need WordPress, so directly tap the Add New button at the top.
Once tapped, the next page will show the WordPress Plugins directory.
You need to search for WooCommerce in the search panel, and under its image, tap the Install button. Once installed, tap the activate button.
Similarly, you can add more necessary plugins to help your clothing store reach maximum heights. And here are some of the necessary plugins that are needed for your online clothing store.
- Website builder plugins: These are the ones through which you can design innovative landing pages. You can include Elementor, WP Bakery, or the Block editor.
- Analytics Plugin: These are the easiest tools to get better insights about visitors and their behavior on your website. You can have the Sitekit plugin.
- SEO plugins: These are tools that help your site boost search engine rankings on your website. E.g., rank math SEO and the best SEO.
- Cache Plugin: Caching plugins are the best to boost your website’s speed. WP Super Cache and W3 Total Cache plugins can be added.
- Cart Plugin: The e-commerce website needs to have carting plugins so that users can easily continue with their purchases. You can have the Ecwid E-commerce Shopping Cart plugin.
6. Create web pages.
Once you have all the vital assets to create a clothing website, it's important to make sure that the site has core pages.
Creating web pages is much easier in WordPress, as you can simply navigate to the Pages section from the dashboard area.
It can be easier when you have selected the pre-designed templates. It holds templates for the homepage, About Us, blog, privacy, and contact page.
The homepage addresses the first look of your website. Here we are talking about the clothing store, so the homepage would resemble a fashionable and colorful design.
The About Us page gives a thorough description of your brand, its identity, and more facts. The Contact page will have contact details, service details, vital links, an FAQ page, and more.
Other than this, there are more pages, including the shop page, cart page, checkout page, and account page.
But let me tell you that WooCommerce automatically creates vital pages like car, shop, account, and more. While it happens that most of the users skip that part, you need to create them from scratch. Here’s how you can create them:
a) Shop Page
To create a shop page, simply navigate to the Pages section of your admin dashboard. A blank page will appear, and you will need to name it Shop Page.
Again, reach the admin dashboard, then Woocommerce, and then select the Products option under the Settings page. You need to select your shop page under the Select a Page box section.
b) Cart Page
To create a cart page, create a blank page and name it a cart page. Then add a short code block, enter
[woocommerce_cart]and publish the page on your site.
c) Checkout Page
To create a checkout page, simply create a blank page and name the page. Add a short code block and enter
[woocommerce-checkout]then publish the page.
d) Account page
Account can be created by simply adding a blank page and naming it as Account Page. Again add a short code and enter
[woocommerce_my_account]Save and publish the page.
7. Add Products
And now comes the most vital stage, when you need to add products to your website. To add products to your WooCommerce store, simply follow the below steps.
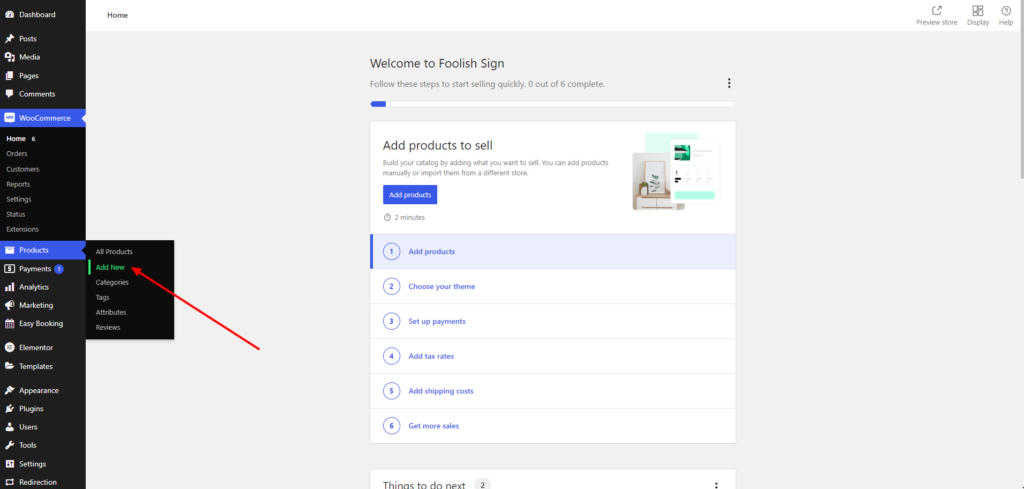
On your WordPress dashboard area, navigate to WooCommerce and then the Products section.
Under various options, tap the Add New option.
A new window will appear with the necessary fields to fill up. Here, you need to first add the product name and then the long product description. Along with this, you can see a short description by scrolling down to the short description section.

Next, to add product data, simply tap the Product Data section and the General section. Here, you can select from simple, grouped, affiliate, or variable products. It even allows you to add the regular price, sale price, and more.
The inventory section will help you add the stock availability of the product.
Similarly, you can explore more sections like shipping, linked products, attributes, categories, tags, images, and more.
Once you are done with all the settings, simply tap the publish button, and your product is on board. You can add more such products using the same process. You can get a detailed customization tutorial on our previous blog WooCommerce customize product.
But this is not the last step; you need to add payment methods to ensure safe payments for users. This is also considered as one of the crucial steps for to create a clothing website.
8. Set up online payment methods.
Online payments Make sure that your online transaction is done without any flaws. So before moving further to launch your website, make sure you have set up the payment methods.
Among so many payment methods like credit, debit, Apple Pay, WooCommerce Payments are the simplest. As we are moving every step with WooCommerce, then why not use its payment extension?
Yes, and to get this WooCommerce payments extension, reach your admin dashboard and tap Plugins.
Press the Add New button and continue to search for the WooCommerce Payments. Once found, tap Install and activate it. It will immediately appear under the WooCommerce section of the dashboard area.
By tapping on the Payments option, you will be asked to set the payment methods. You can choose from debit and credit cards, Google Pay, Razor Pay, and more.
You can even customize the refund process, checkout, and shipping from the same page.
9. Preview and Launch your Clothing Store Website
So, you are now ready to get your clothing store site sent live on the web. You have got all the right assets and steps done with the creation.
But make sure you preview whether everything is working well or not. You must check that the product pages and other core pages are loading well.
Plugins are in running condition; they are not creating any mishaps on your site. Or your products are displayed well with the right details.
Once you are cross-checking your site, it is now time to launch it on the web.
Conclusion
Create a clothing website, and give your clothing brand the right recognition on the web. This is where you can have the best of your business along with the right identity and revenue.
Earlier, it was all about having strong coding skills or having a niche website. But not with WordPress; website creation is a matter of hours, and that too the user can handle it. You simply need to follow the above steps in the blog:
- Get a domain and a hosting service.
- Set up and install WordPress.
- Get the best theme for your clothing store.
- Install vital plugins.
- Create vital pages.
- Add products
- Set up online payments.
- Take a preview and launch your site.
- Once you are thorough with the process, you can have your clothing store website in no time.
Blogs Categories
Podcast WordPress Theme (Audio Podcast 2.0)

Latest WordPress Themes


Buy All our Premium Themes just at $119
